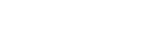
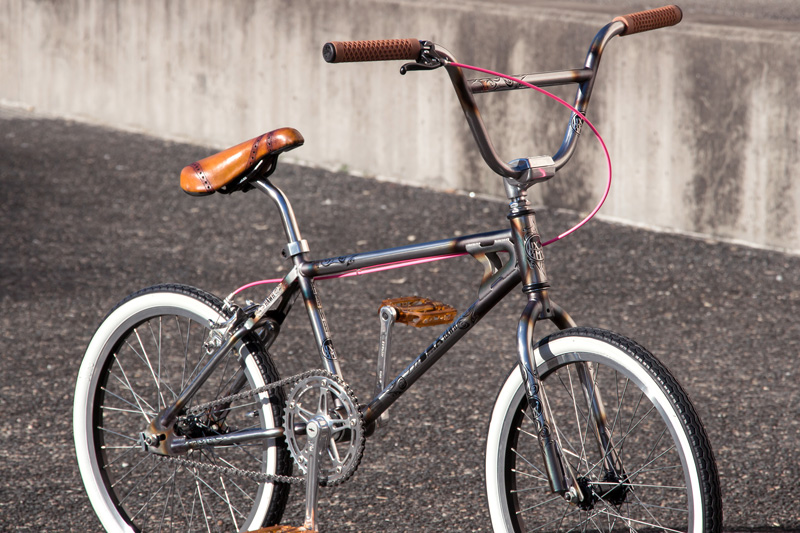
1980 COBRA PRO
WINNER: 2013 PUSHIES GALORE BUILD-OFF
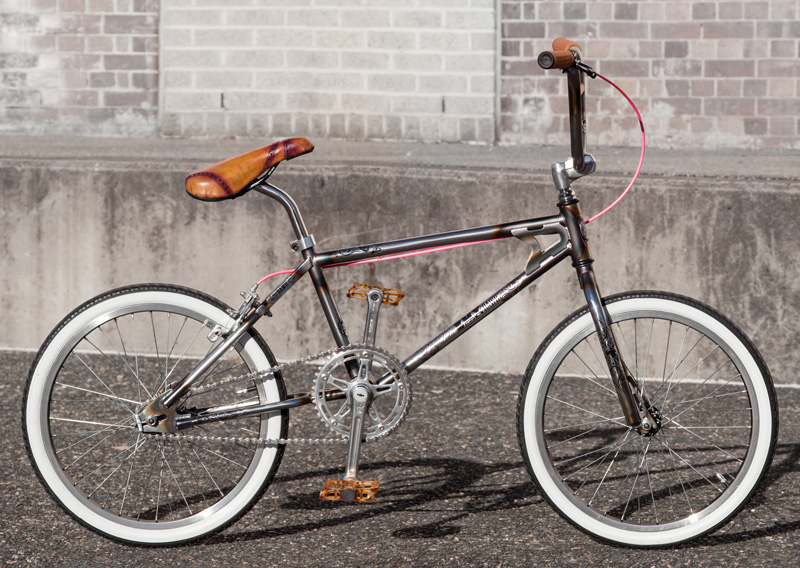
Meet the LixBMX ‘RAWR’ Custom Pro, my custom creation for the 2013 Pushies Galore BMX Build-off. I was initially disappointed when I first found out that the build-off rules required there to be no brand names on the frame (other than our own, or fictional) and no professional refinishing (DIY only), but after mulling it over for a few days a new kind of excitement kicked in. This point of difference in the build criteria has forced me to think outside the box and play to my love of design with no ‘era-correct’ aesthetic to fence me in.
BUILD CONCEPT
My plan is strip the frame right back and give it a contemporary raw-look finish with some cool trompe-l’oeil heat-tint-esque detailing around the welds. After detailing I’ll clear coat it and build it up with a hybrid vintage-meets-street aesthetic – the complete antithesis of ‘factory’. I’m going to use parts I already have lying around, most of which I’ll need to strip/polish/restore to suit the build and bring the bling. My budget for the build is $100. I’ll be sticking to it like glue, so it’ll be all about elbow grease and transforming my old orphaned parts into something special.
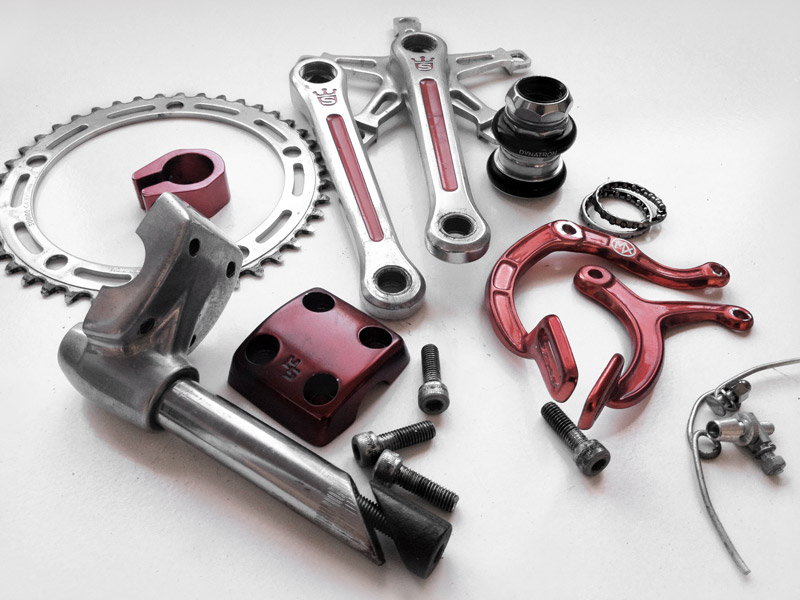
PARTS LIST
(White = parts I already have, Red = need to purchase)
Frame & Forks: 1980 TBC Cobra Pro by Koizumi (to be stripped, polished, custom detailed and clear coated)
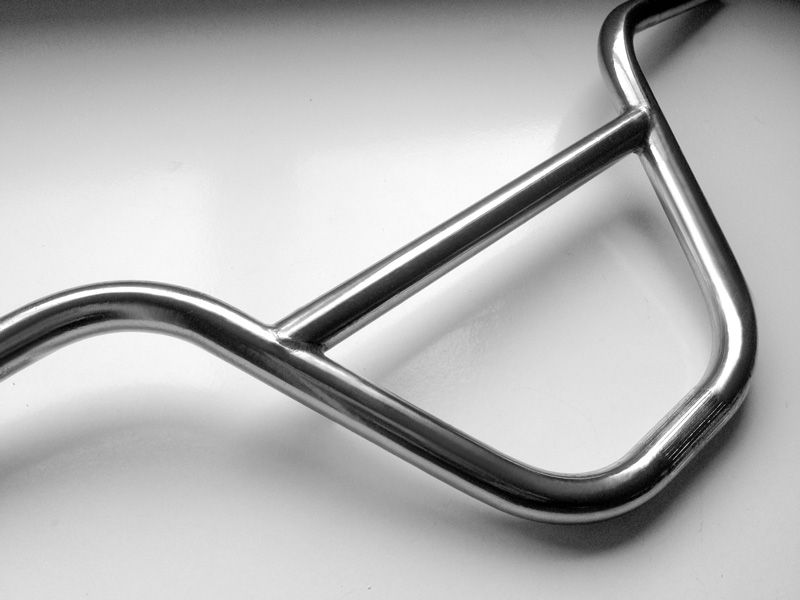
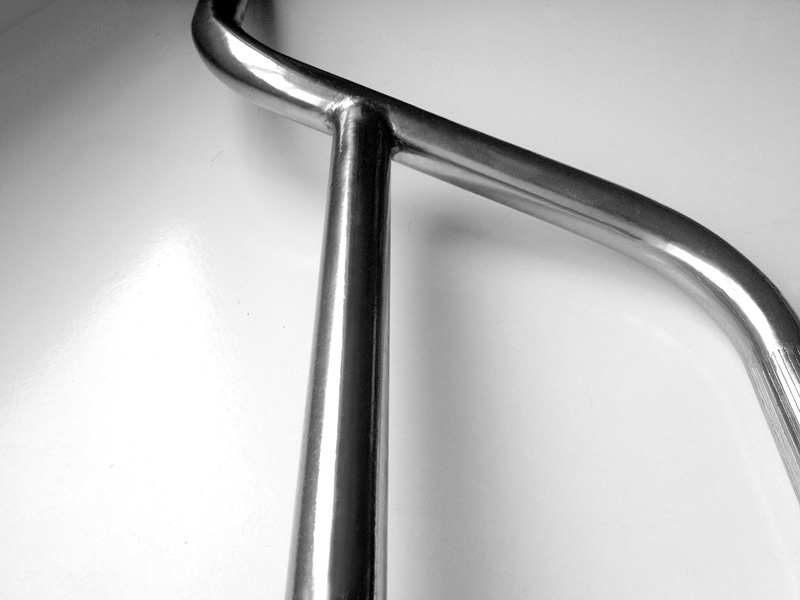
Bars: Mongoose Supergoose cromo, (to be stripped, polished, custom detailed and clear coated)
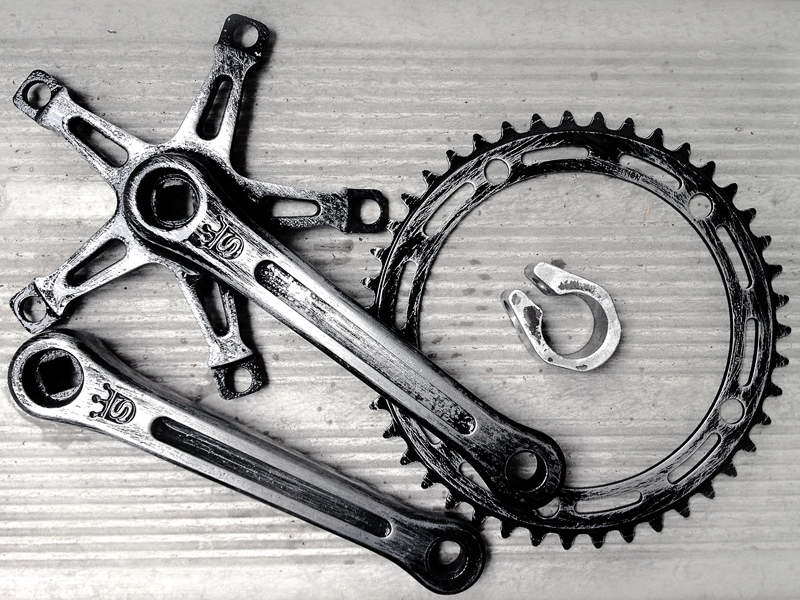
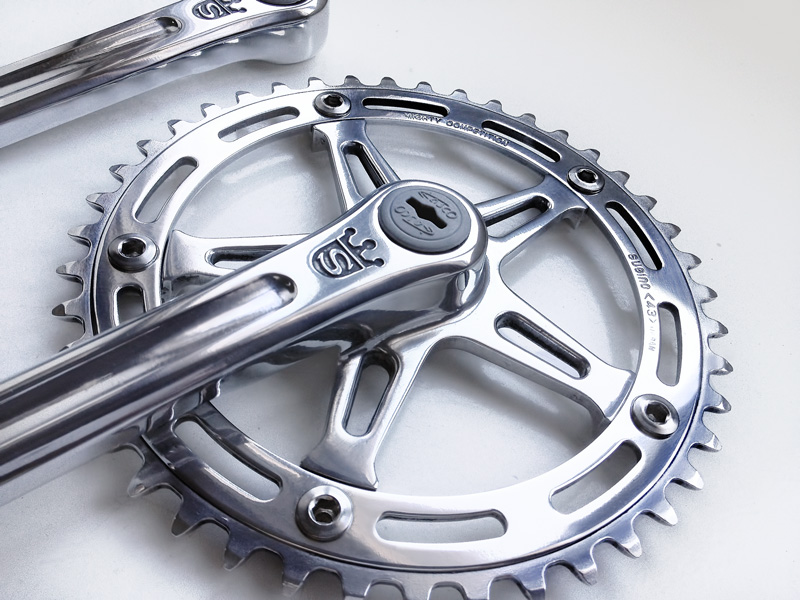
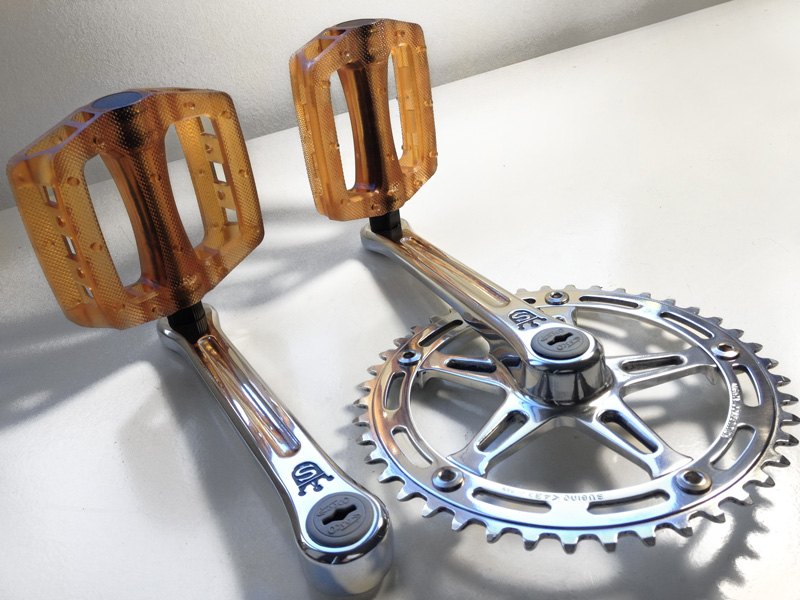
Cranks: Sugino Mighty 3PC with matching 43T chainring (both to be stripped and polished) with grey crank caps and chainring bolts (from bike-parts-plus-more.com.au)
Bottom Bracket: Hi-Tech square taper (from detailedbikeco.com.au)
Pedals: Carbon Cycles eXotic PC platforms in ‘Cola’ (translucent brown) with crmo spindles (from carboncycles.cc)
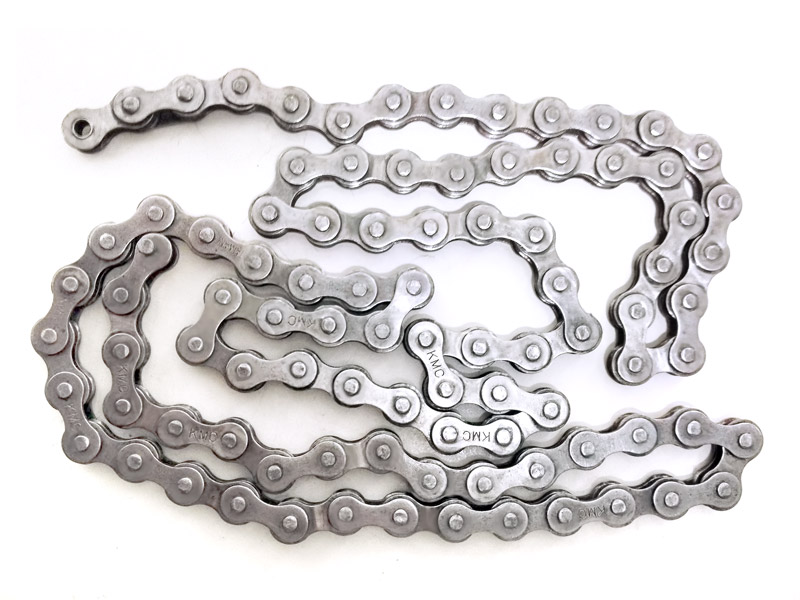
Chain: KMC (to be cleaned/stripped and polished)
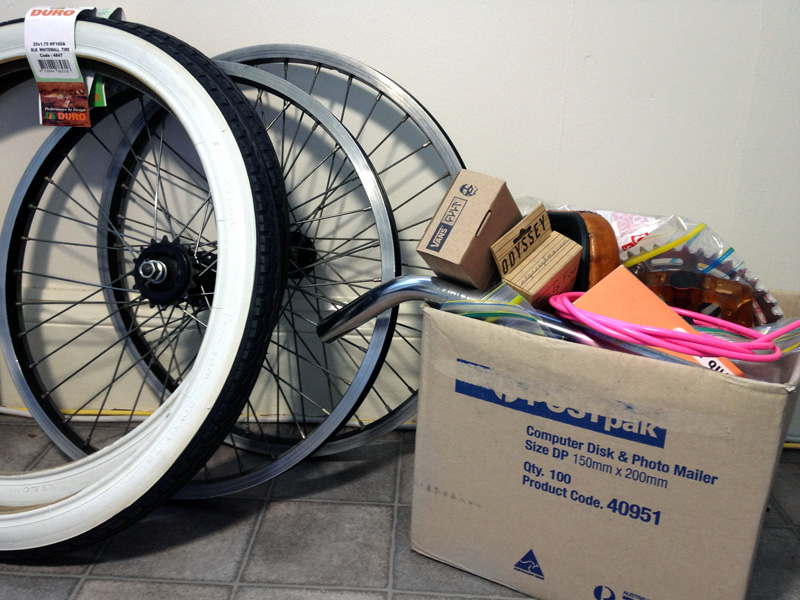
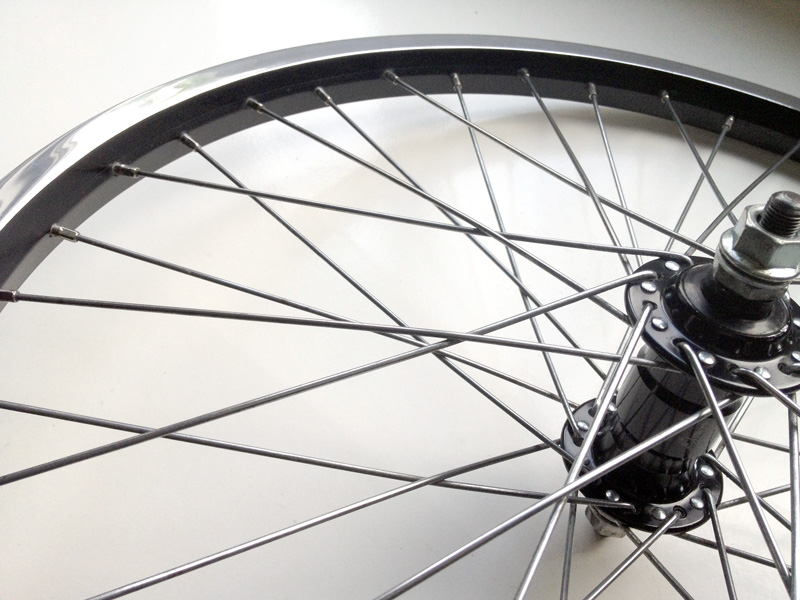
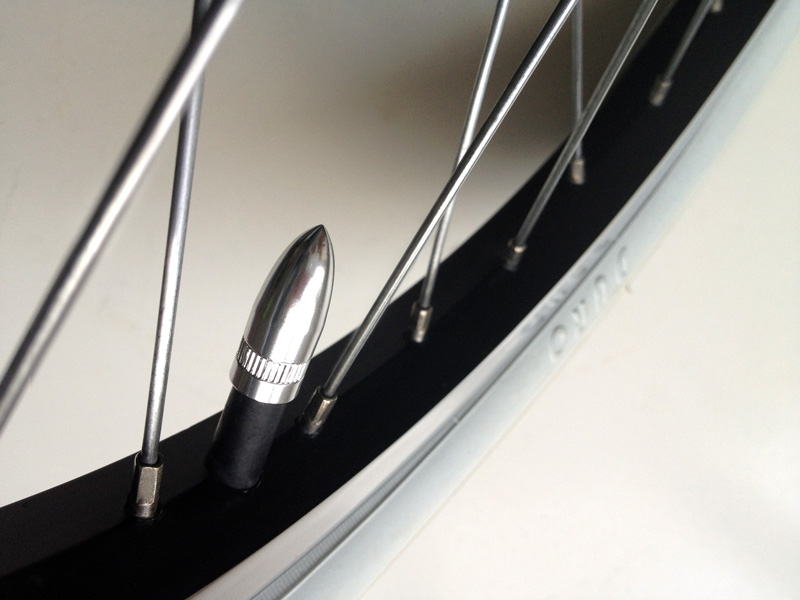
Wheelset: Alex 36spoke alloy rims, black/shiny side, with low flange Mongoose hubs (hubs to be cleaned, shiny sides and spokes to be polished) with silver missile valve caps (from bike-parts-plus-more.com.au)
Freewheel: Dicta 16T
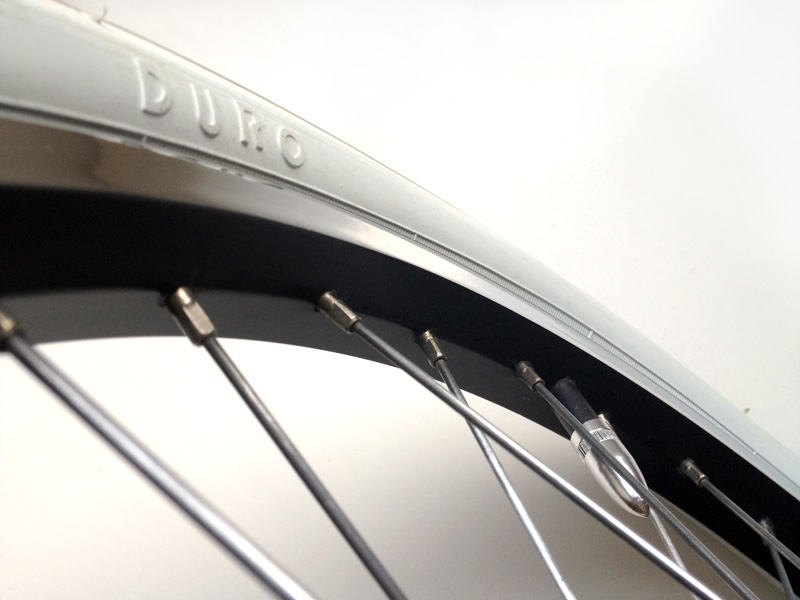
Tyres: Duro whitewall 1.75, street tread (from bike-parts-plus-more.com.au)
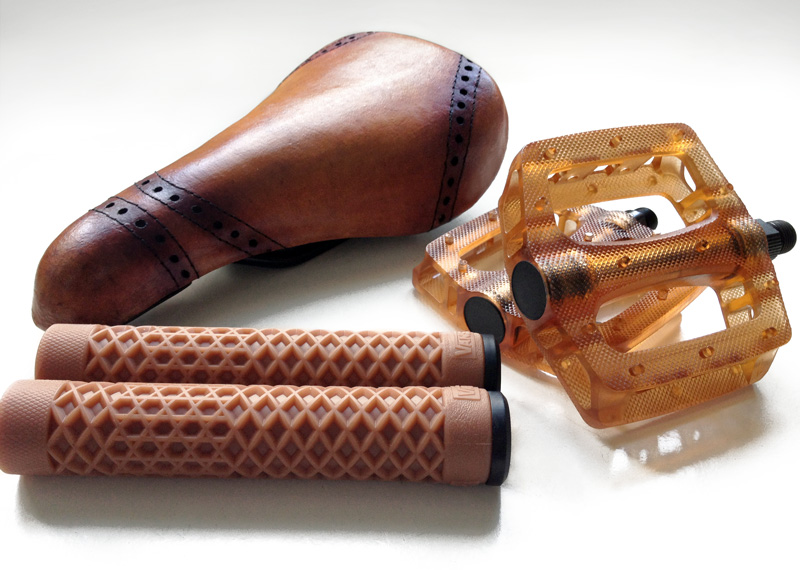
Seat: UGP (to be stripped and recovered in custom tooled, stitched and brush dyed leather) with black seat guts (from bike-parts-plus-more.com.au)
Seat post: Generic cromo layback (chrome finish)
Seat post clamp: Tuf-Neck copy (to be stripped and polished)
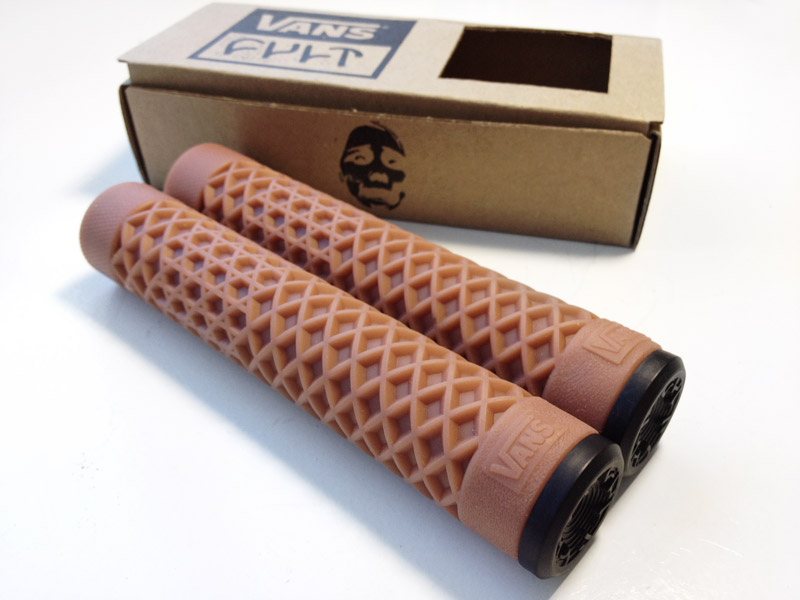
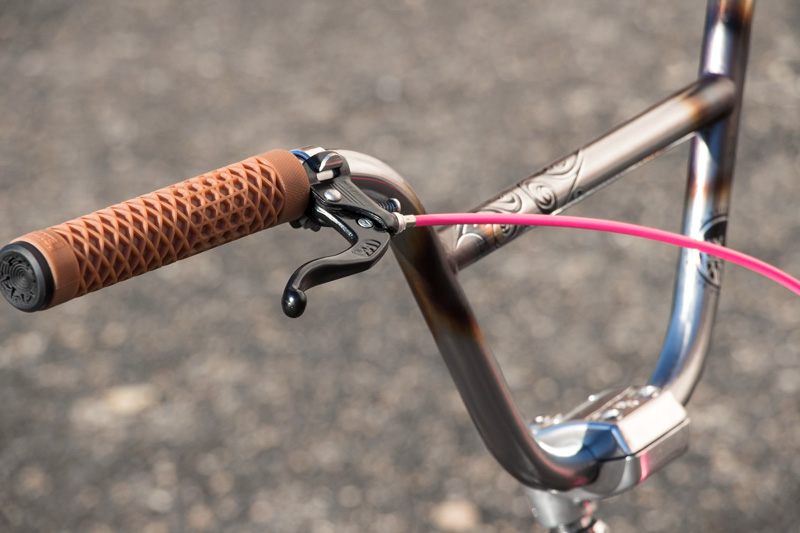
Grips: Vans waffle grips by Cult, in brown with black bar plugs (from LuxBMX.com)
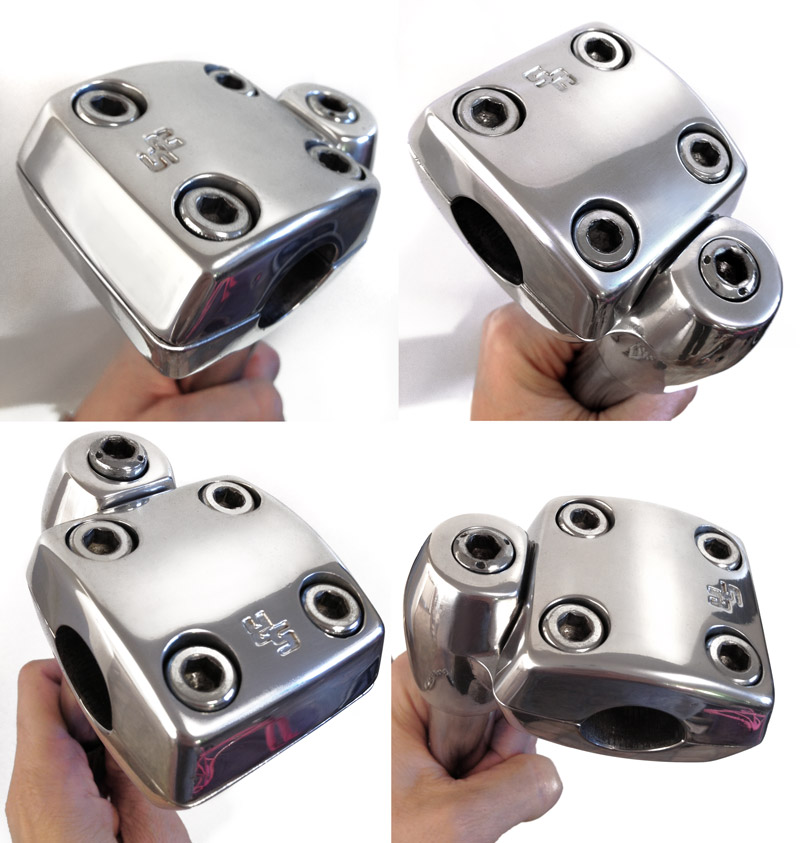
Headset: Odyssey Dynatron
Stem: SR MS-420 (to be stripped and polished)
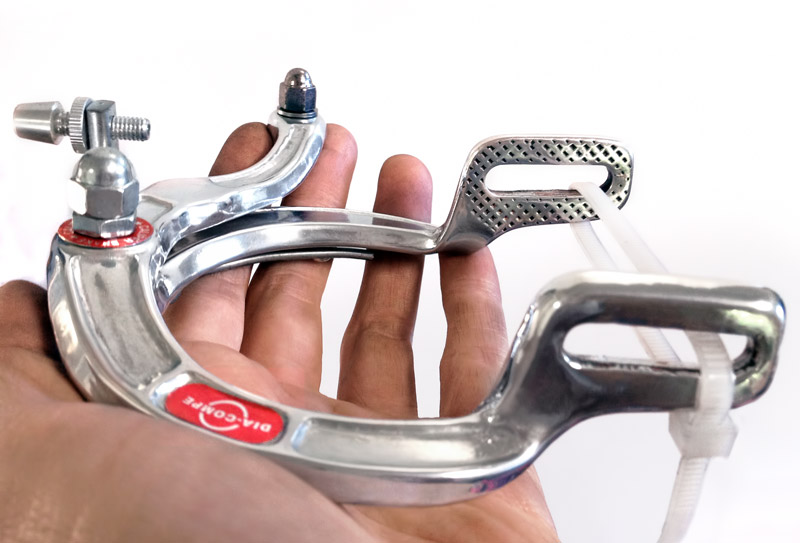
Brake (rear only): MX-1000 copy (to be stripped and polished)
Brake lever: Dia Compe MX-124, black (refinished for another build, but not used)
Brake Cable: Hi-Tech inner with Porkchop BMX neon pink housing (from PorkchopBMX.com)
Budget breakdown:
Grips: $20
Tyres: $30
Pedals: $10.75
Chainring bolts: $9
Crank caps: 60c
Seat guts: $4
Valve caps: $2.50
Brake Cable: $15.99
Bottom bracket: $0 (bartered)
HISTORY
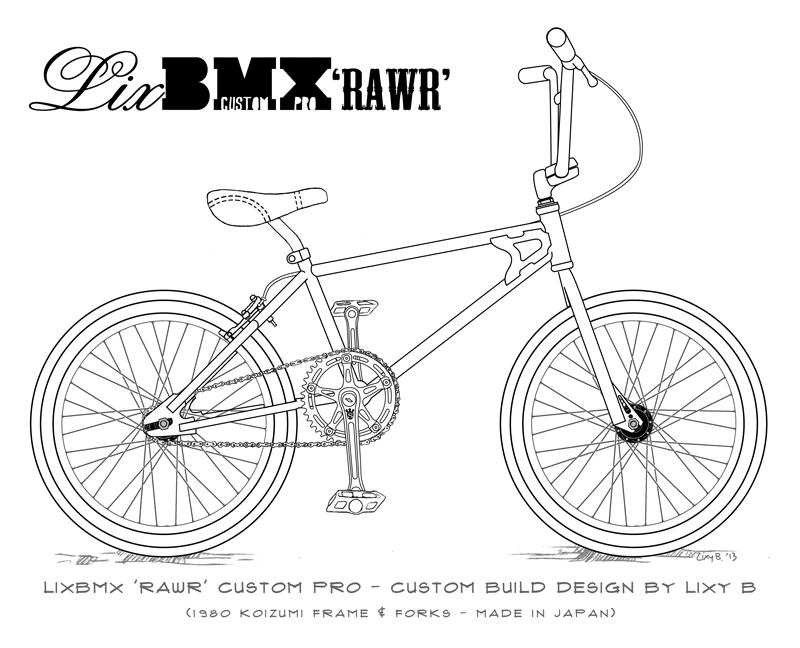
In its day this Koizumi made TBC Cobra Pro frame was also released as the Diamondback TK, Centurion Force and the (Diamondback) Pro-Star A-Series. The ‘Cobra Pro’ branded release was the Toowoomba Bicycle Company’s pro race BMX intended to stack up against Mongoose and similar pro race frames of the time.
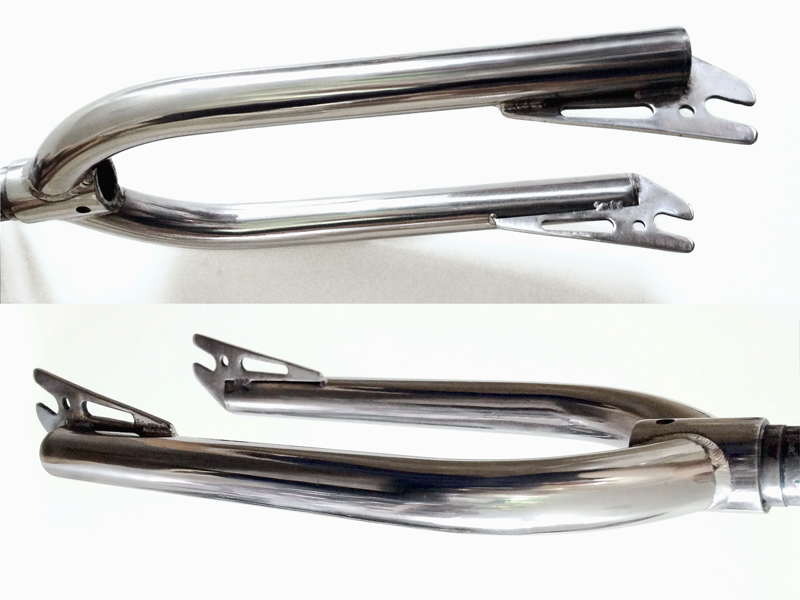
This is how it once would have looked in its youth…

Alternately, it could have looked like any of these had it landed in another company’s shipment off the factory line…
But now it’s destined for something entirely different…
BUILD DIARY
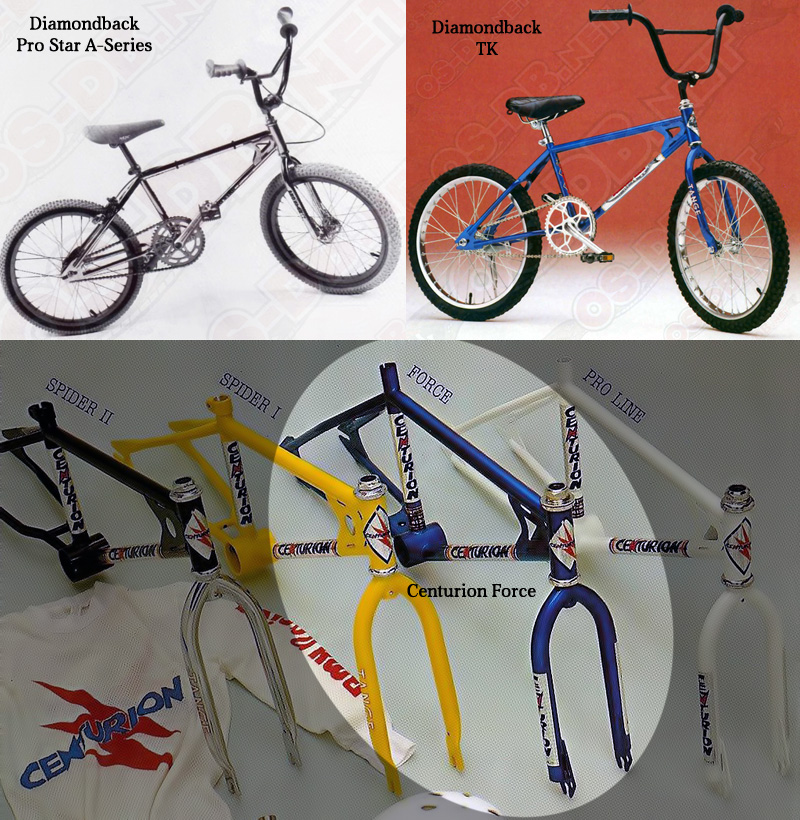
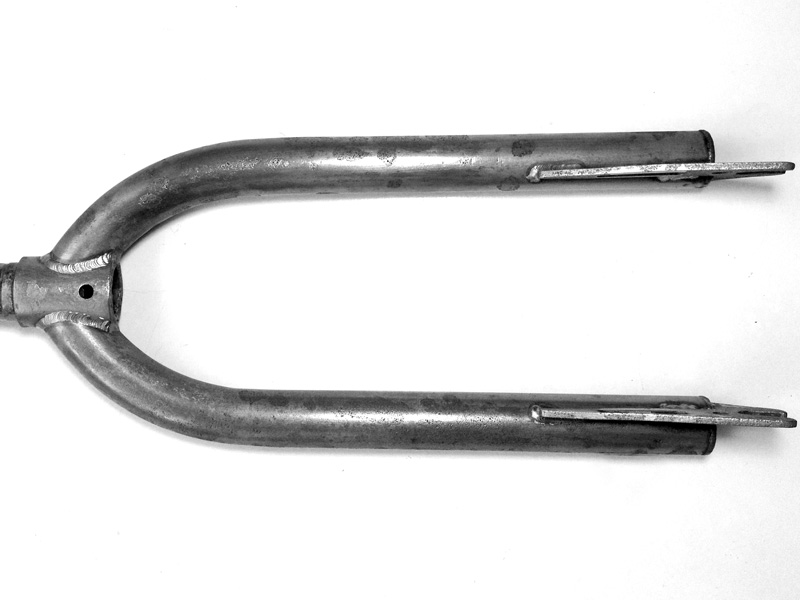
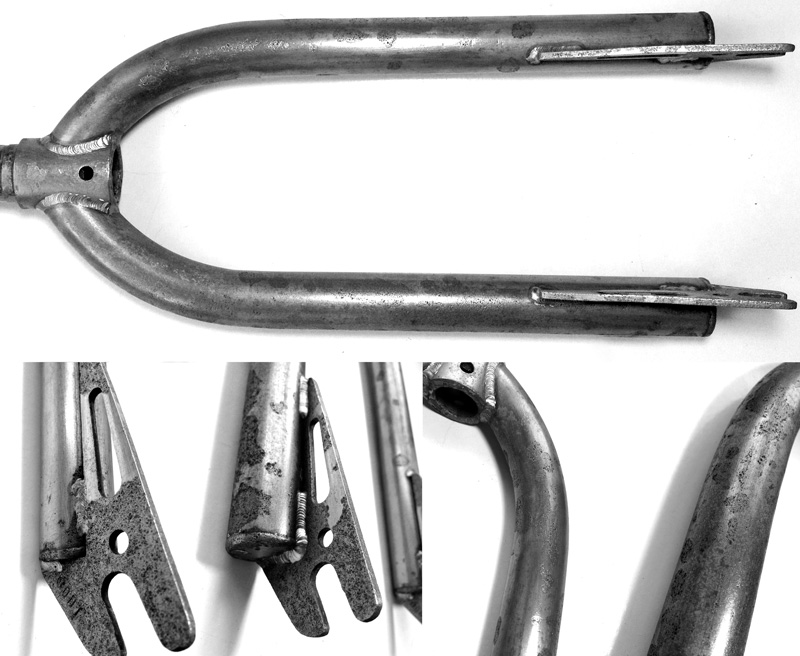
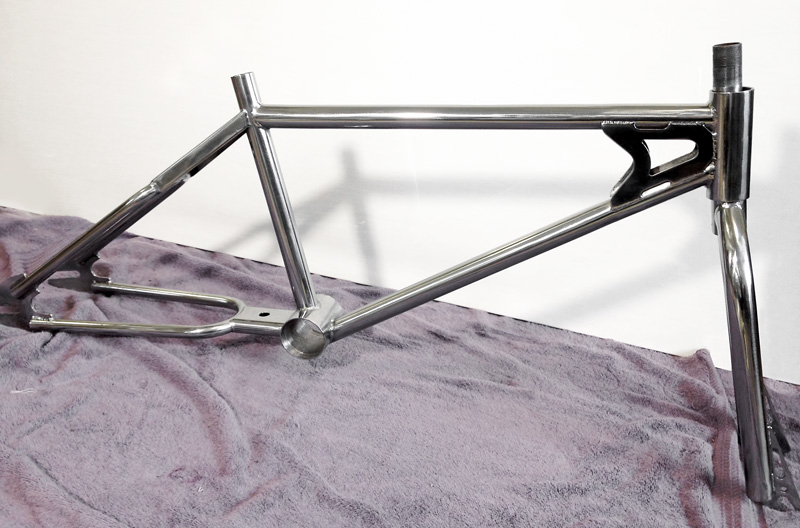
Here’s the frame set, as I got it back in mid 2012, in need of some serious TLC…


First mission: Acid bath to clean up the rust. I’m using vinegar this time – 4L to a shallow bath (it’s only about 75c per litre) just covering the frame. You can see the rust just falling off the frame after only a couple of hours…
And while the frame’s busy taking a bath…
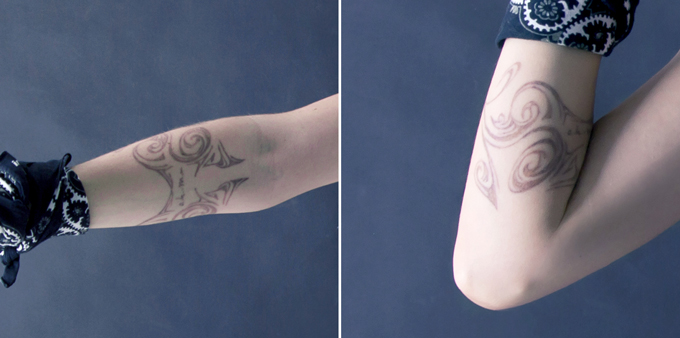
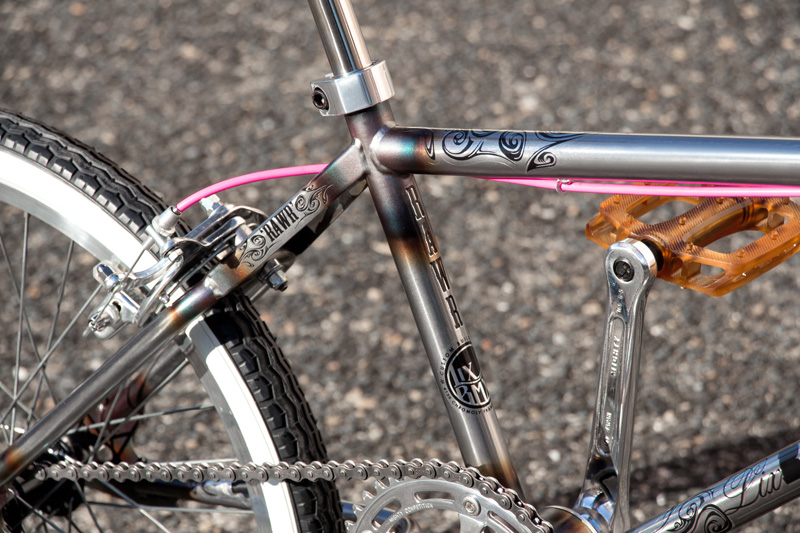
The design of the decal set was one of the pivotal points of the build concept, and was of the first thing on the agenda for the RAWR Custom Pro. My decal design is an eclectic mix of contemporary street style and and some of my own favourite flavours (western hipster chic? haha). The design was inspired by the tattoo I drew and had inked on my right forearm after my grandmother passed away in 2001. Here’s the tattoo…
Here’s the ensuing decal set design…
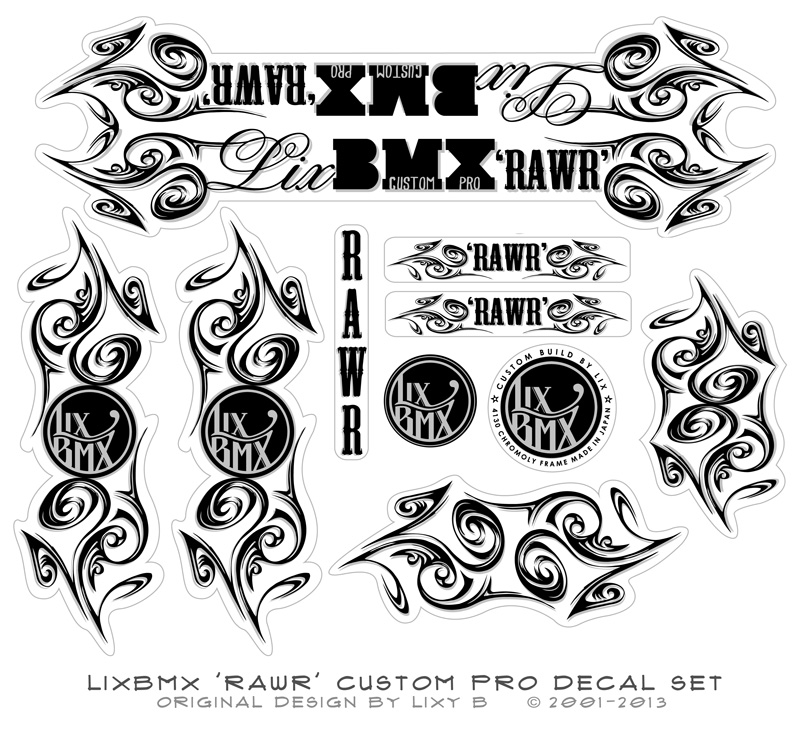
And here’s the finished decal set printed in black and silver foil ink on clear vinyl…

The forks are first out of the bath. The rust is all gone, but there’s a lot of clean up work to be done to get rid of as much of the surface pitting as possible…
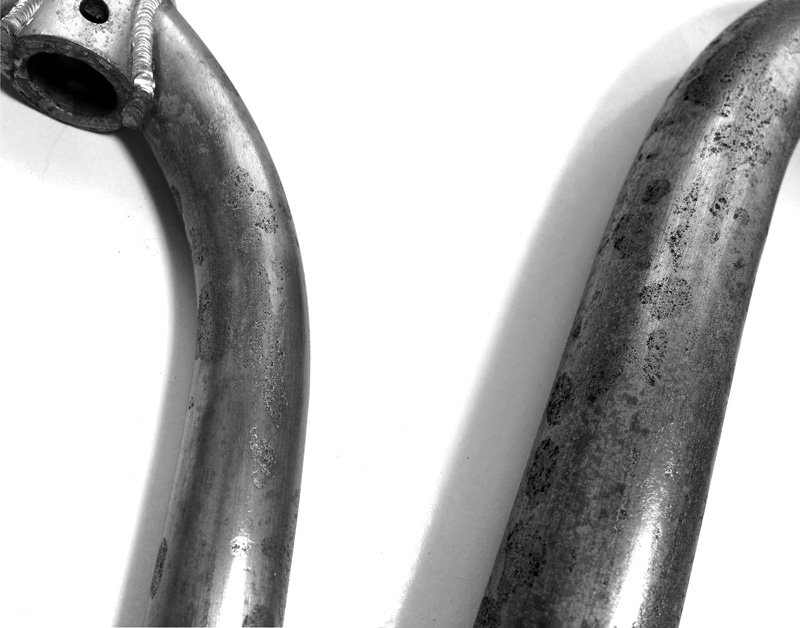
The Koizumi baseball stamp on the forks hasn’t been completely pitted away, it still clearly reads ‘⚾0DT’…
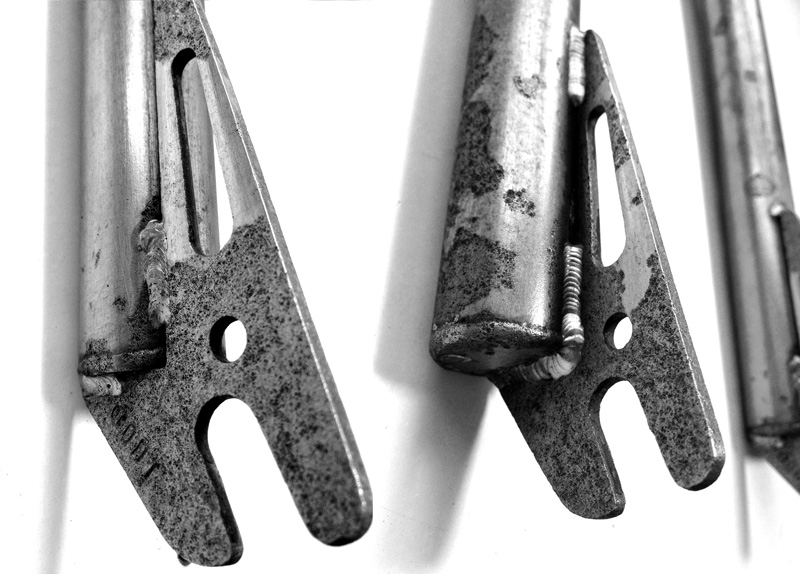
Sanding and filing, filing and sanding, sanding and filing to clean out the pitting…
Stripping the frame…
Stripping reveals more pitting on the frame, which means it needs more of the same filing/sanding love that the forks have had. I’m determined to get it up to scratch for clear coat though, so I hope the neighbours enjoy my metal-on-metal symphony for the next few weeks…!


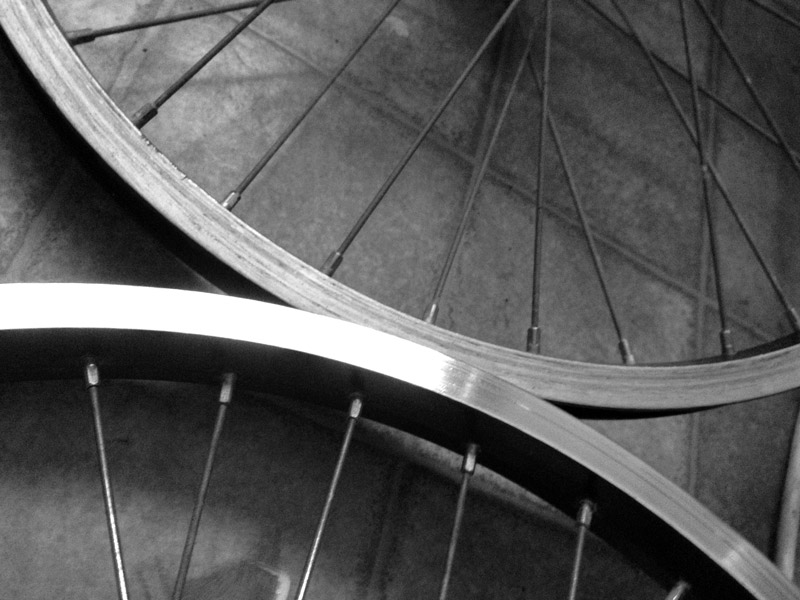
With a light sand and a few polishes with Purple Polish, the shiny sides of the Alex rims are going to come up a treat (polished sample on the rim in the bottom of the pic, compared to the untouched rim at the top)…
The frame is coming up well. Slowly but surely. There’s a lot more ground to cover than there was with the forks… but the pits aren’t as deep so I can see where I’ve been relatively quickly. There’ll be a lot of sanding to do to smooth out the file marks once the pits are all gone…
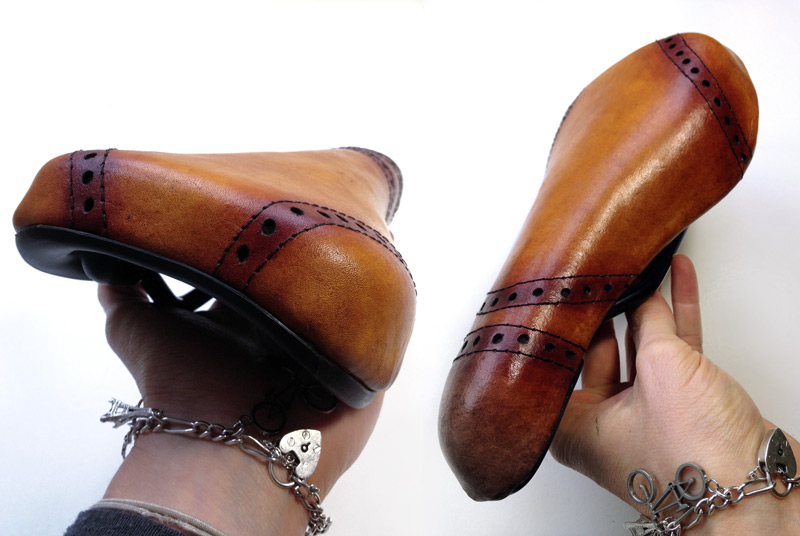
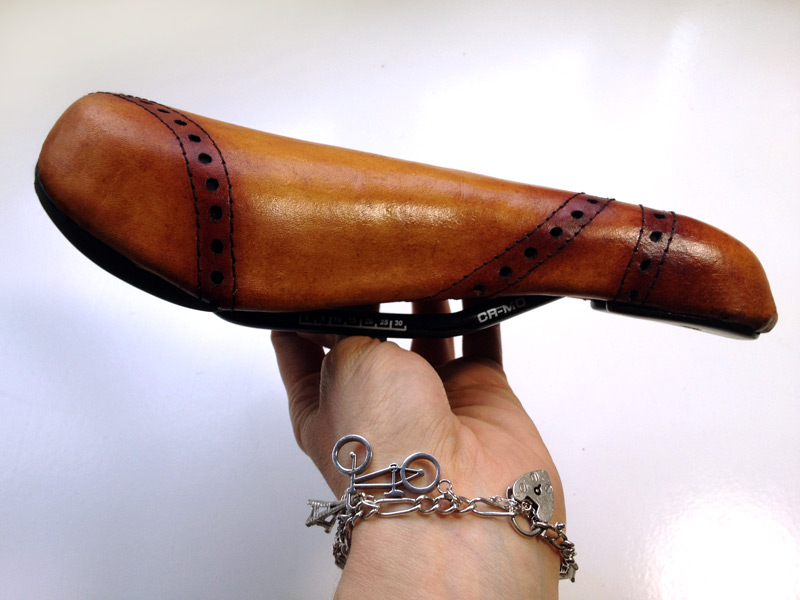
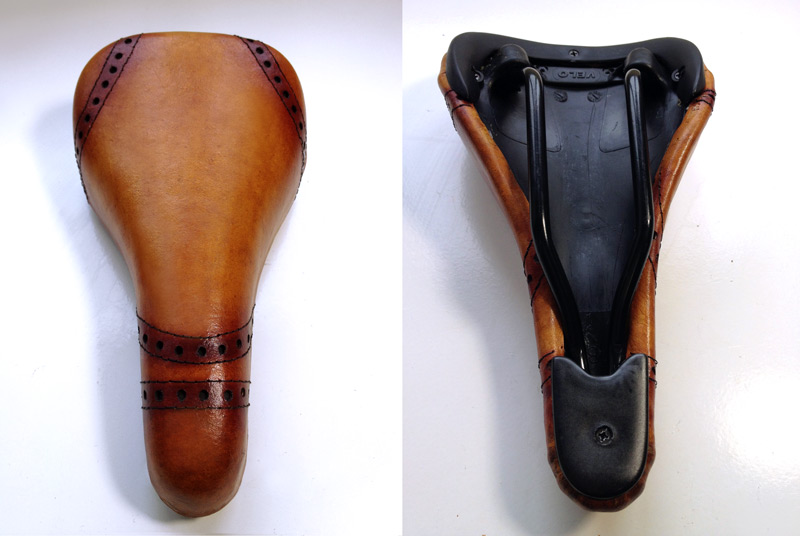
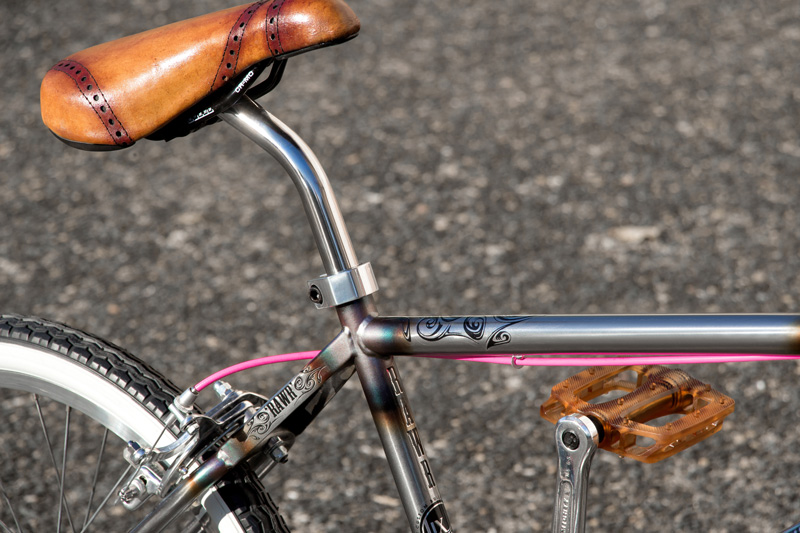
A short time ago I fell in love with artisan BMXer Carson Leh‘s beautiful brogue style leather bike seats. I’ve been dying to get one of his seats for the ‘next build’ … but, with this turning out to be the ‘next build’, purchasing one would have unfortunately blown my $100 build budget out of the water! Soooo… I decided get creative and do my own take on a custom brogue-esque leather seat cover inspired by Carson’s awesome work. Fun times ahead!!
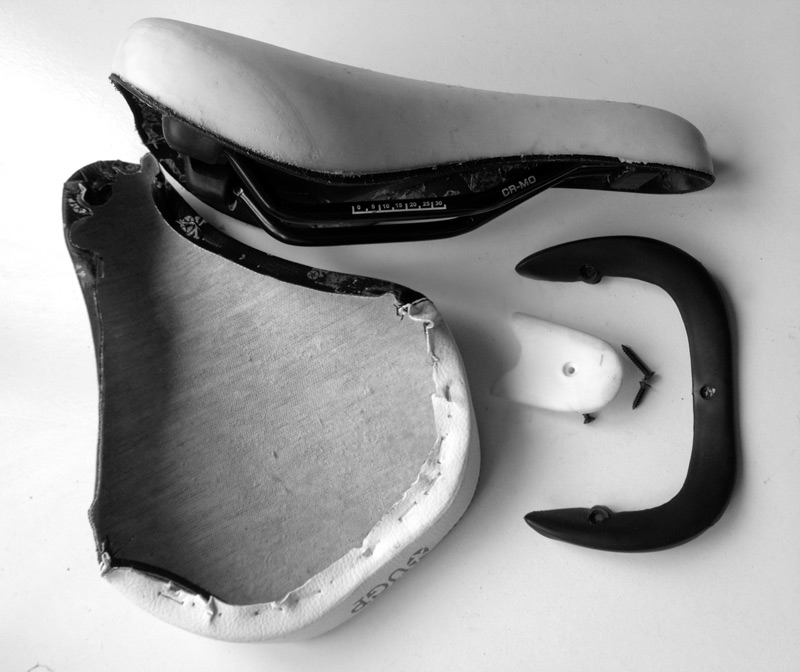
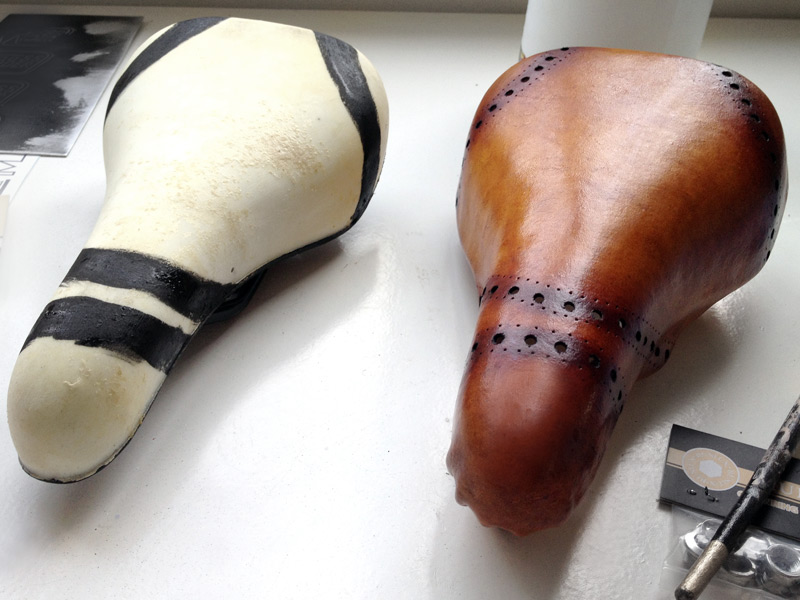
First step: Dismantling the UGP seat I’ll be re-covering…
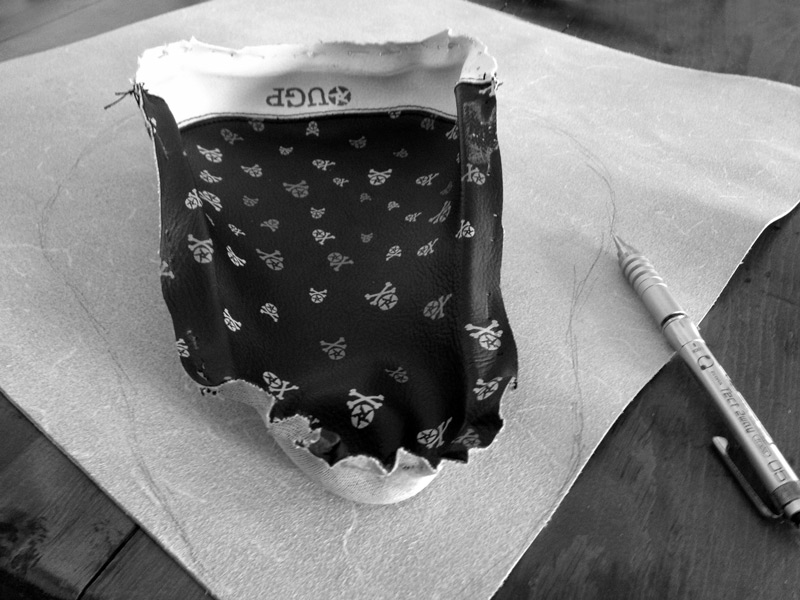
I used the original cover as a template, drawing around it onto the underside of a square of vegetable tanned tooling leather…
Then I set to work roughing out a design…
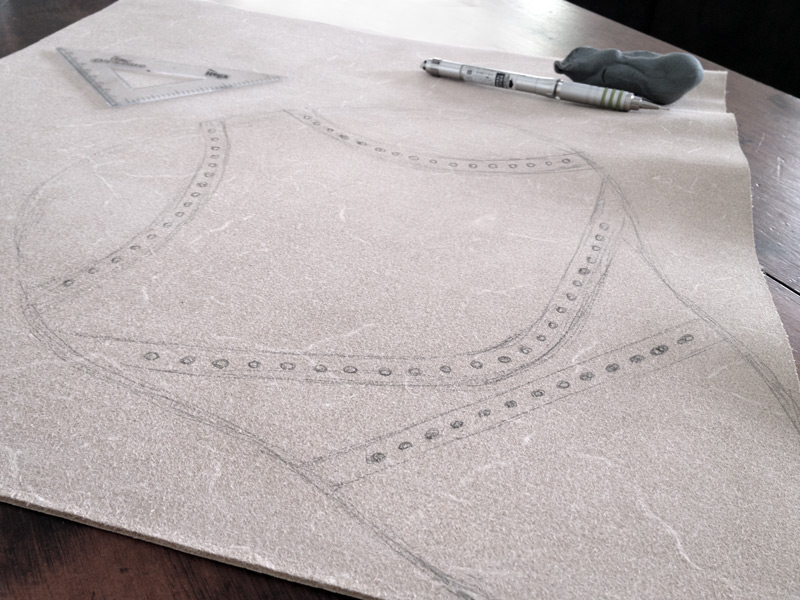
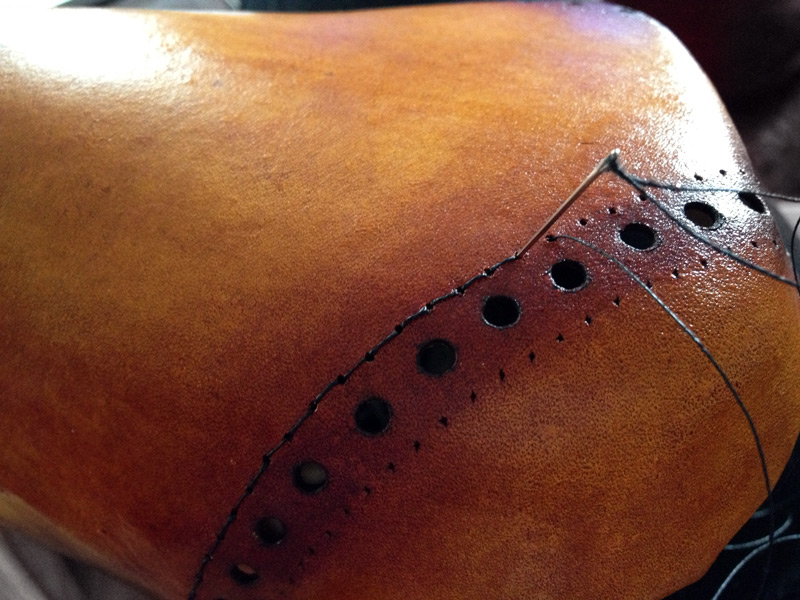
Then came time to attack it with the leather punch…
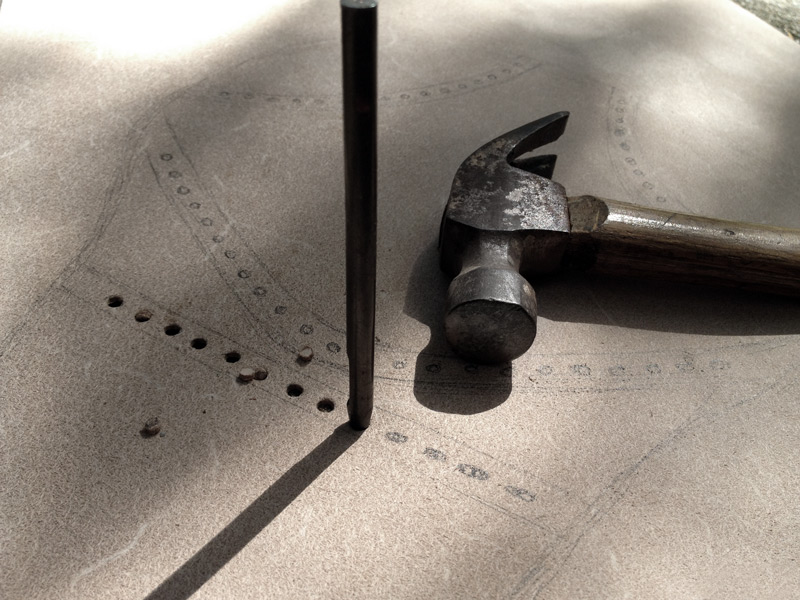
All holes punched, shape cut out and small holes pierced for the linen top stitching (to come later)….
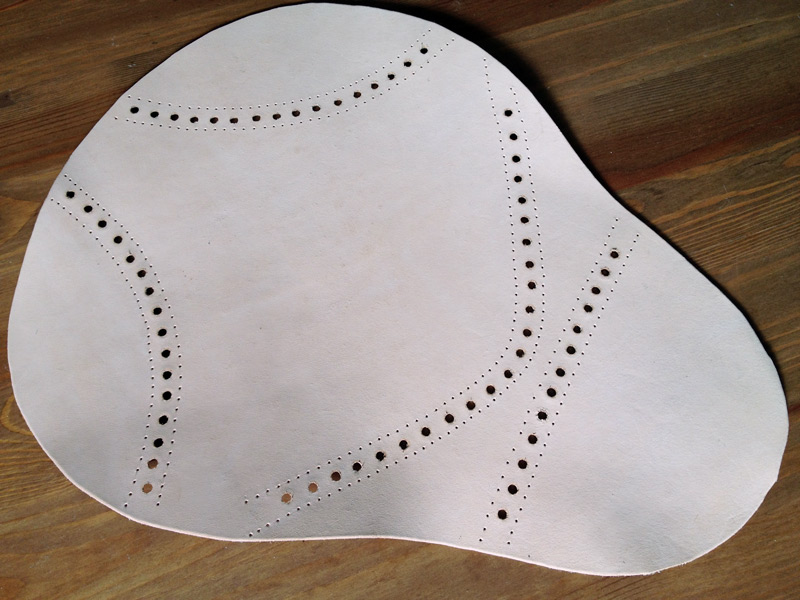
I then soaked the piece of leather with water to mould it to the contours of the seat (vege tanned leather is AWESOME the way it does that!). After working it by hand for a short while I left it to dry in the sun for an hour on the window ledge…

Once dry it had taken up the contours perfectly…
Now ready for dying. I used spirit based dye in Saddle Tan for the base coat with and a darker reddish brown for the detailing…

I sealed in the dye with a gloss top coat and, when dry, I removed the cover from around the seat for the final finishing touches. It held its shape beautifully…
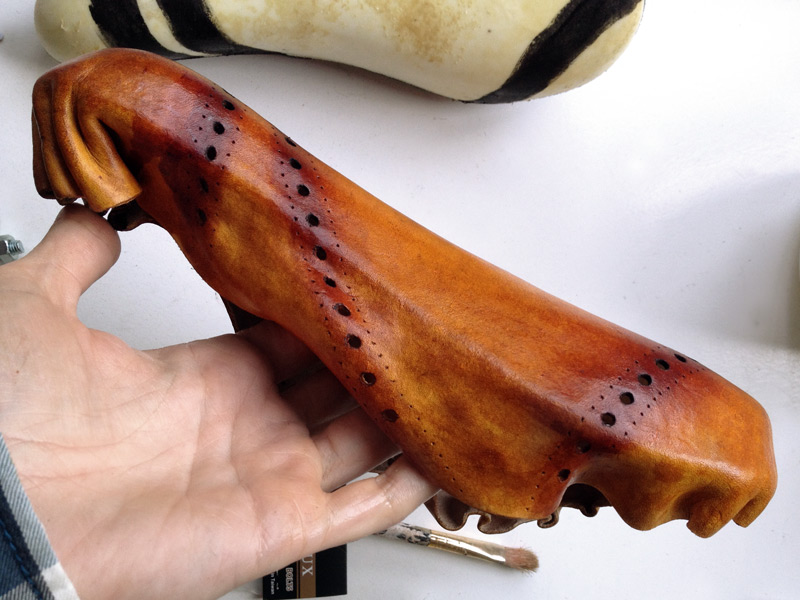
I used black acrylic on the areas of the seat foam where the holes in the design will sit so that the black will show through the holes…
Final top stitching, by hand, with black linen thread….
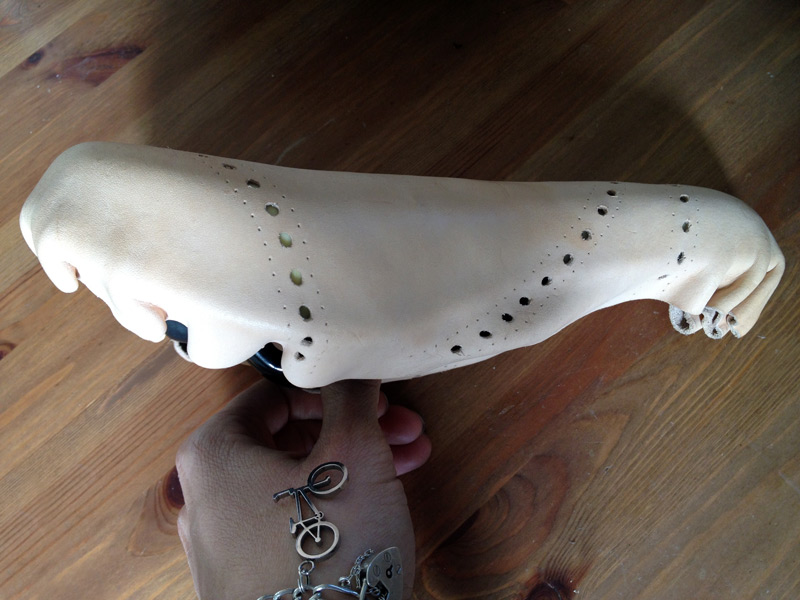
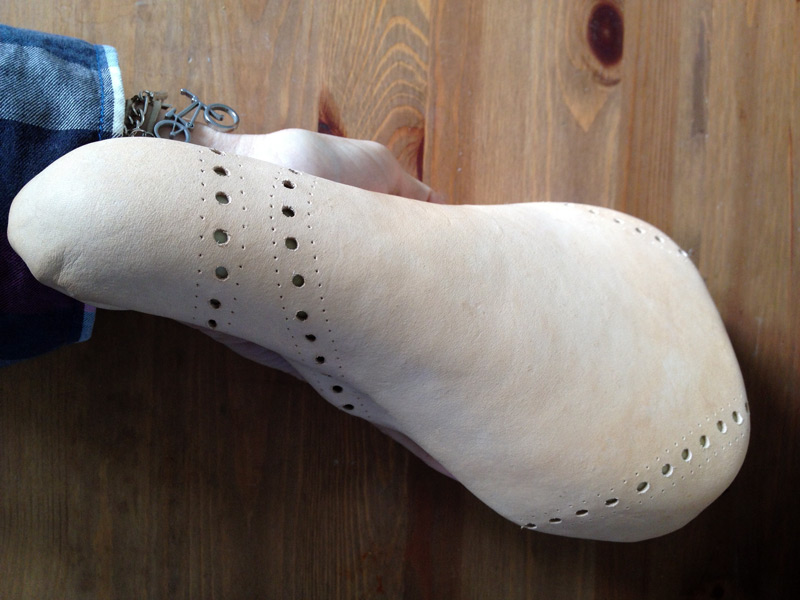
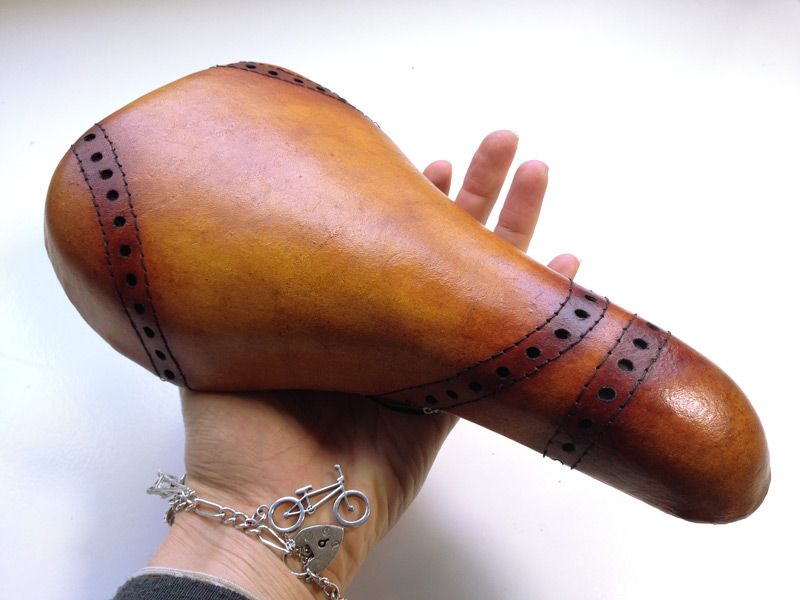
Then I trimmed, glued, stapled and bracketed the finished cover into place. Soooo stoked with the finished product!
Here it is, all done…
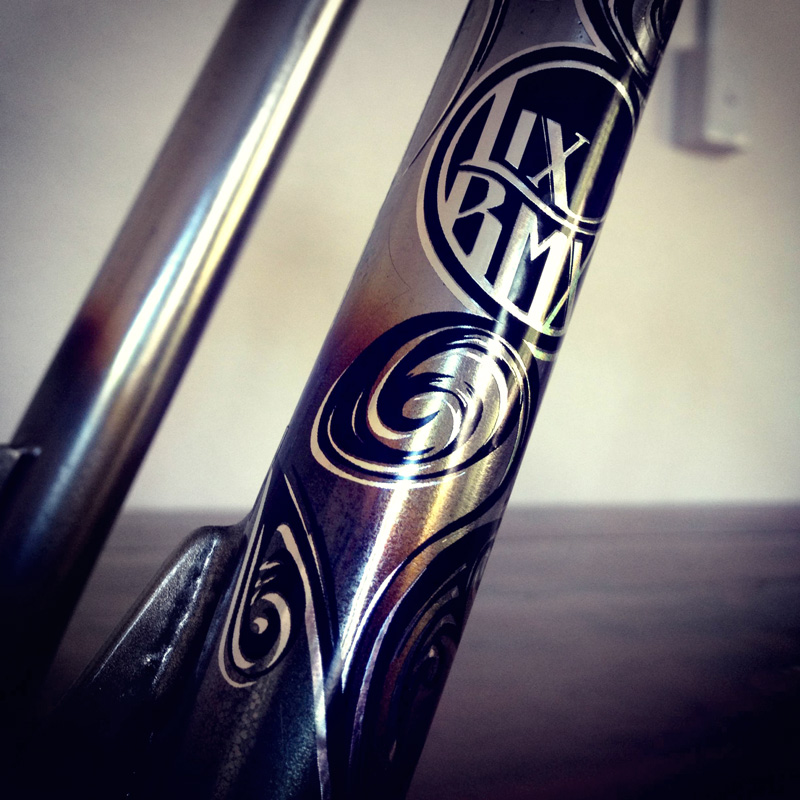
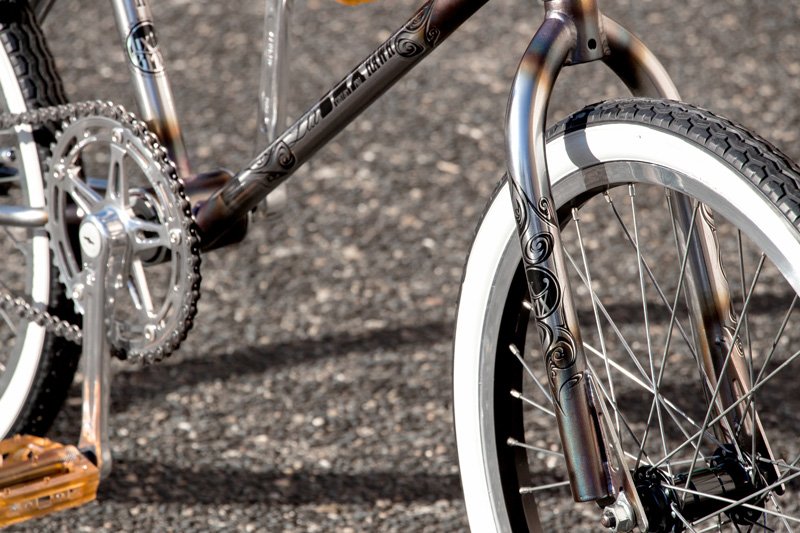
When I designed my decal set for the RAWR build I had something a little special in mind for the head tube. The decal itself is just an area of the tattoo pattern, without any icon or text, because of what I plan to fit over the top of it…
When my good friend Julian from Griffin Engraving first got his engraving machine and was experimenting with what it could do, he was awesome enough to use one of my designs as a test to see how it turned out. Here’s the raw engraving he sent me…
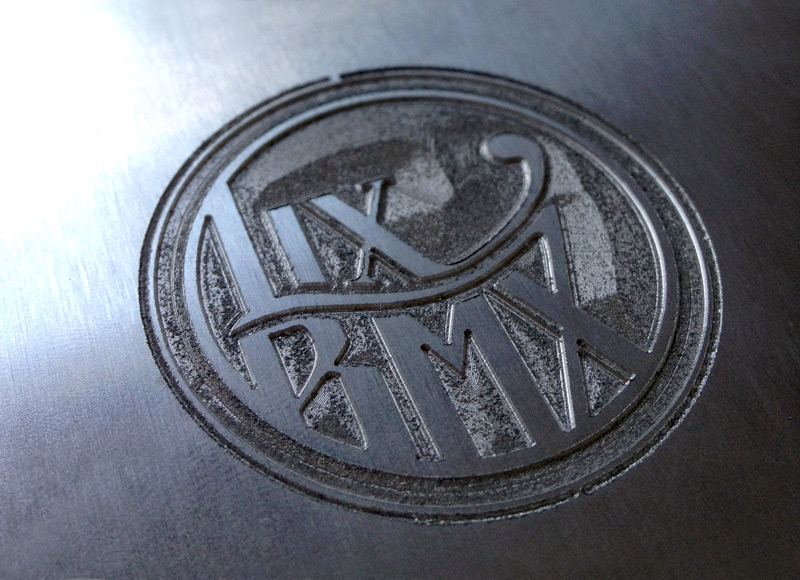
It was so cool, I wanted to see if I could turn it into a head tube badge. So I sanded back the rough edges and used a wire brush tool on the Dremel to smooth back some of the machine marks. Then I gave it a few coats of black metallic lacquer and sanded back the high points. I then cut it out by hand with a piercing saw…
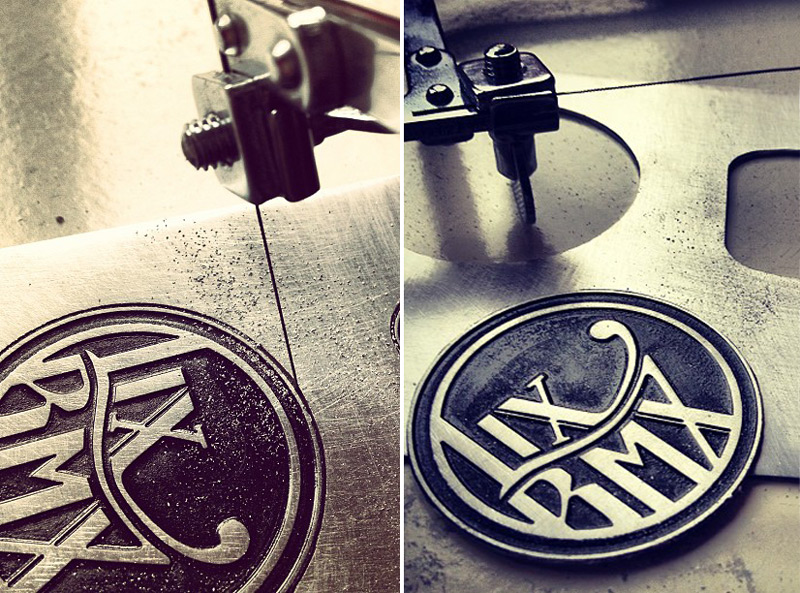
Then I used a rubber mallet to shape it around the head tube of the RAWR frame, and polished the high points with Purple Polish. I finished it off with about 6 coats of gloss acrylic lacquer. Now it’ll fit beautifully over the centre of the tattoo pattern head tube decal on the finished RAWR frame… 🙂
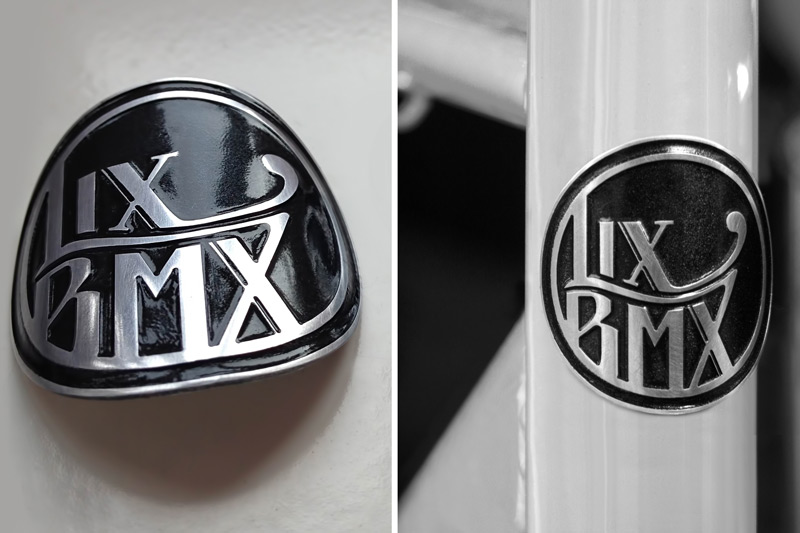
Two completed pieces to join the decals in the ‘finished’ pile of RAWR build parts!
![]()
Progress pic of the forks. Still got a fair way to go sanding out the file marks and polishing but when I look back at the pics of the way they were when they came out of the acid bath I’m really pleased with how they’re coming up – it makes all the effort worthwhile!
Just picked up these AWESOME little waffley pieces of classic Vans radness. Soooo cool! I couldn’t have asked for a more perfect product to have been released just in time for this build! YAY!
A few integral pieces of the parts pile. The red will be disappearing today – paint stripper for the painted parts, caustic soda for the anodised parts. Then they’ll be ready for polishing.
The Dynatron needs new crown bearings… an easy fix to pick some up from the local bike store, but I’m glad I discovered it now rather than later…
While stripping a bunch of other parts today I also stripped an old KMC chain I had that I think must have originally been blue before it was spray bombed red…
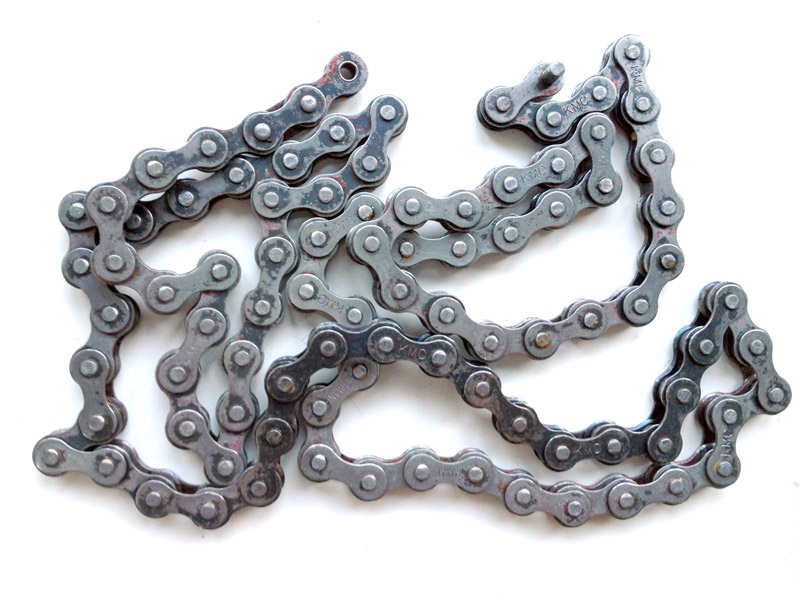
I polished each individual link with a Dremel wire brush to get the rest of the old finish off. The effect turned out to be pretty cool… kind of brushed-steel industrial which totally works with the street vibe of the build. I know it would have been easier just to buy a new chain (!) but, aside from sticking to my $100 budget, I love giving new life to old things and this one was in good nick under all the paint….
Paint and anno all successfully stripped. Started polishing up a storm…
I’m sure I have some black DC and MX stickers in a draw somewhere. Hopefully they’ll turn up if I dig a bit deeper. They’ll suit the build a lot better than the old red sticker that I’ve refitted for now…

SR MS-420 blinggggggggg….
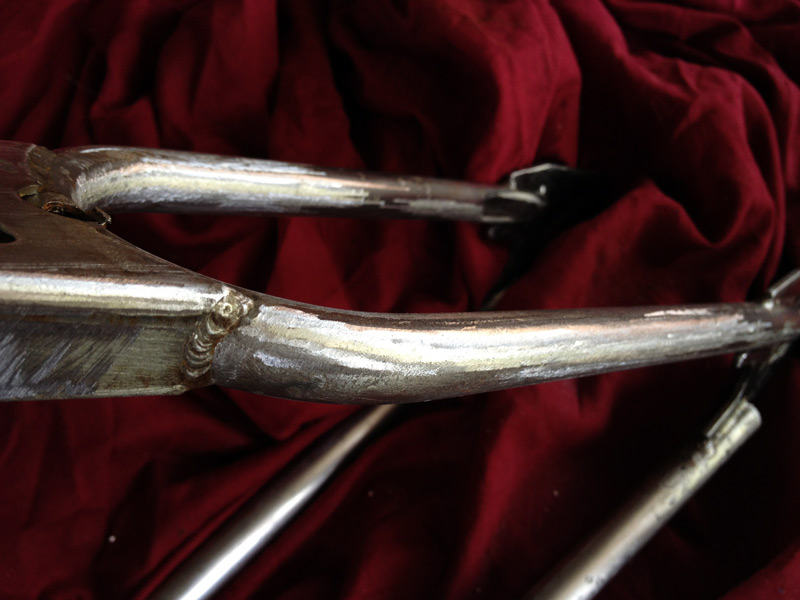
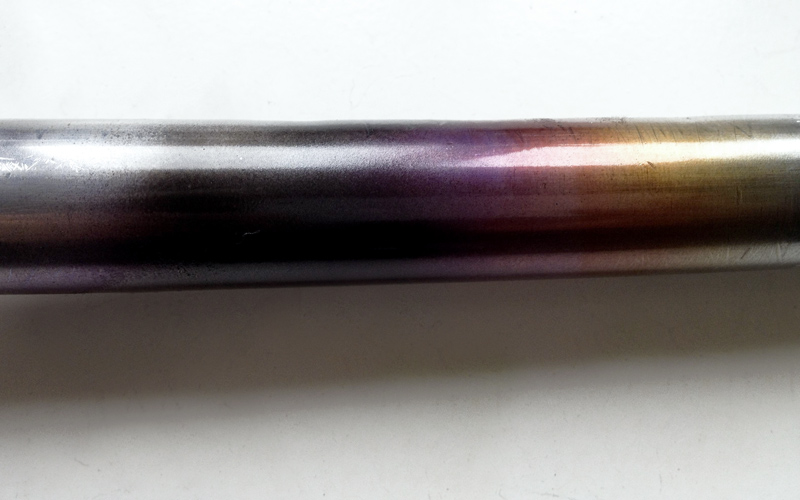
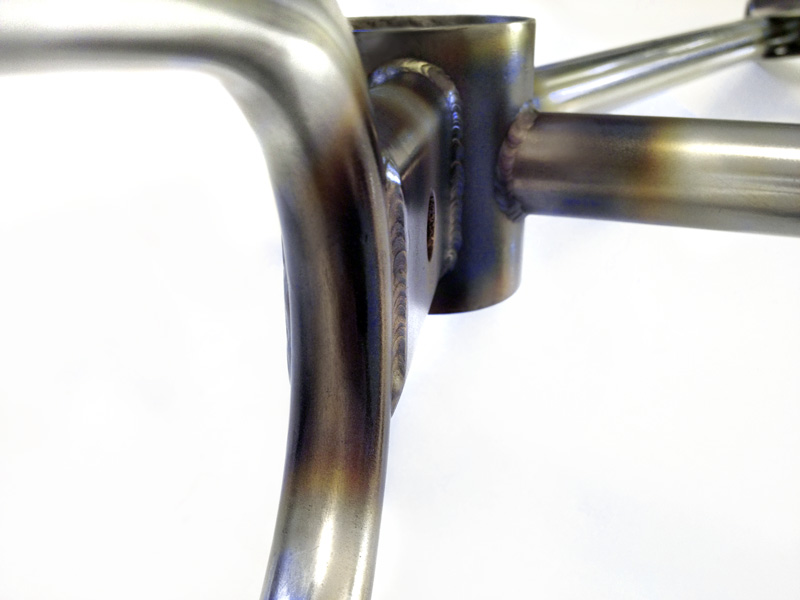
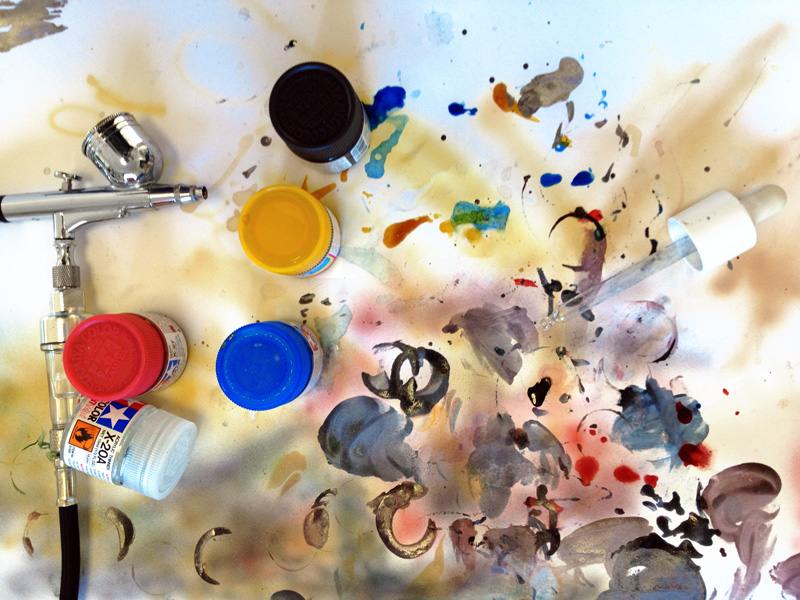
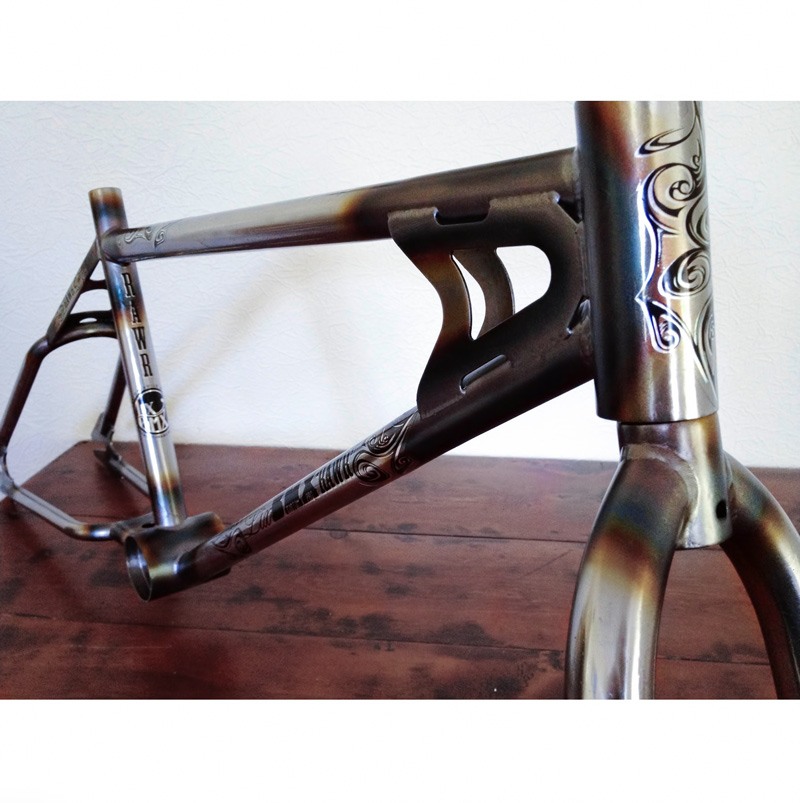
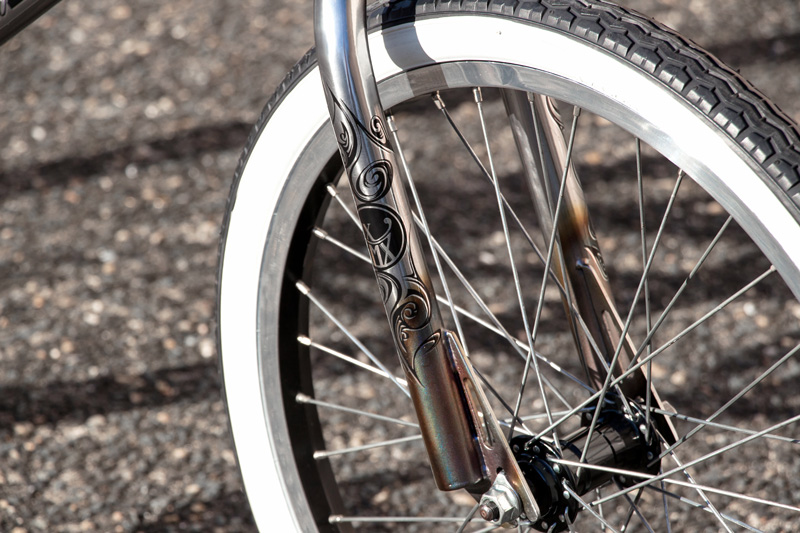
A key feature of the ‘RAWR’ build is going to be the faux heat-tint (temper) detailing around the welds on the frameset. The colours and gradient effects I’ve been playing with are similar to the the rainbow welds on this contemporary Cult frame…

I first trialled Belton Molotow Premium Artist spray paints in Transparent Hazlenut, Transparent Currant Violet and Transparent Mid Grey. The control I got with the fine artist nozzles was awesome… but the colours had a powdery semi-opacity that blocked the sheen of the metal from shining through the colours. Not what I’d hoped from ‘transparent’ pigments.
So I then fell back on an old favourite, Dupli-Color Metalcast, the transparent anno-look paint designed to go over chrome and polished metals. Testing the Metalcast Orange and Purple paired with another of my favourite spray colours, Tamiya Metallic Black, made me realise I should have just gone ‘tried and true’ to begin with. I’m still glad I experimented with the Molotow paints though… even if just to enjoy the control of the awesome artist nozzles.
I don’t have quite the same control with the Metalcast nozzles, but what’s cool about them is that they have a unidirectional spray arc so, when holding the can upright, if I spray from side to side I get a wide stream, and if I spray from top to bottom I get a narrow stream. This means with a bit of practise I can control the width of the spray area depending on the angle I tilt the can. Pretty cool!
Here are some test pieces I’ve done on an old seat post…
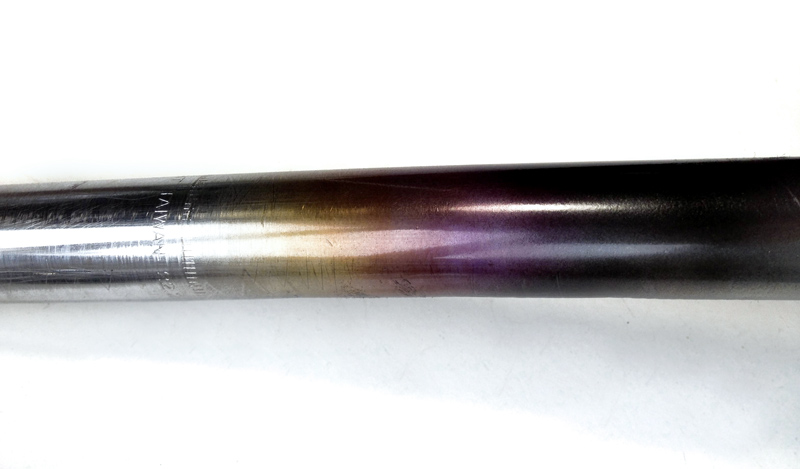
VERY HAPPY! Loving the way the colours are working together and I’m feeling really confident now in my level of control with stroke width and layering around the tubing. Seeing how rad it’s gonna look gives me an extra incentive to keep on keepin’ on with all the sanding and polishing of the raw frame so I can get stuck into the weld detailing when it’s done. Cant wait!
My ‘Cola’ coloured transparent polycarbonate pedals arrived from Carbon Cycles in the UK. Very impressed! They have a beautiful feel to them and the colour is everything I could have hoped for to tie the brown accents of the build together. Really looking forward to seeing them together with the finished cranks… the cool shine of the polished aluminium contrasting with the warm transparency of the brown PC… yum!
Cranks and seat clamp lookin’ sooty straight out of the caustic soda bath. A bit more of a scrub to get the rest of the black residue off and they’ll be ready for polishing…
I thought I’d try out an old trick (used traditionally for cleaning blackened aluminium saucepans) to loosen up the black de-anodising residue. Simmered them for 20min in a solution of 3tbsp of white vinegar, 3tbsp cream of tartar per litre of water. Worked like a charm and softened up what was left of the black soot making it easy to clean it out of the tight corners and edges.
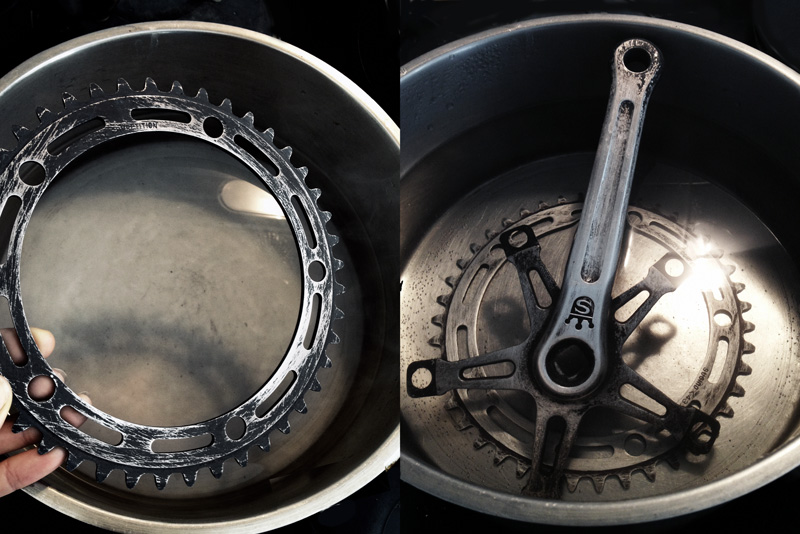
Ready for polishing…
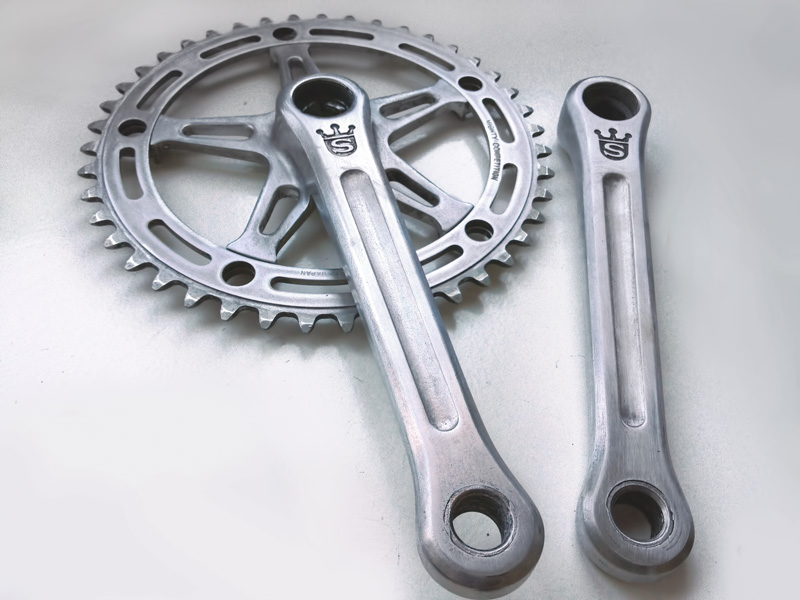
Cranks polished!!
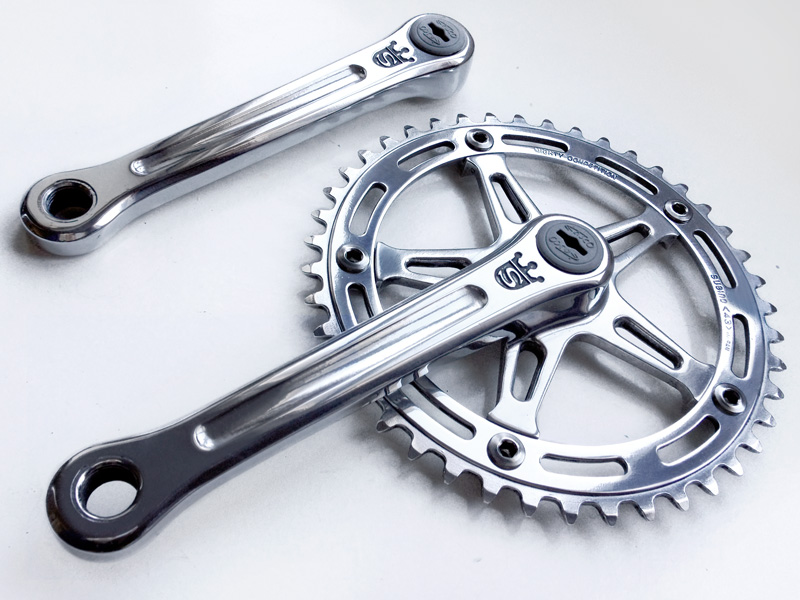
Love the way they look with the transparent pedals…
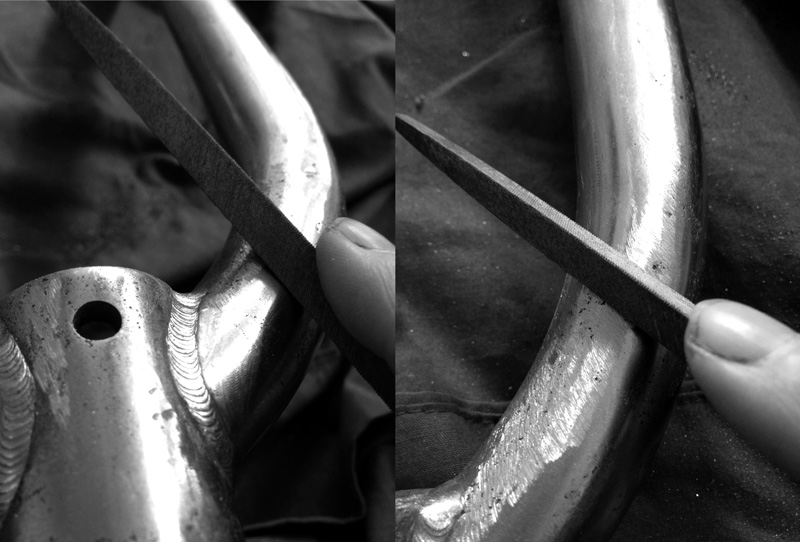
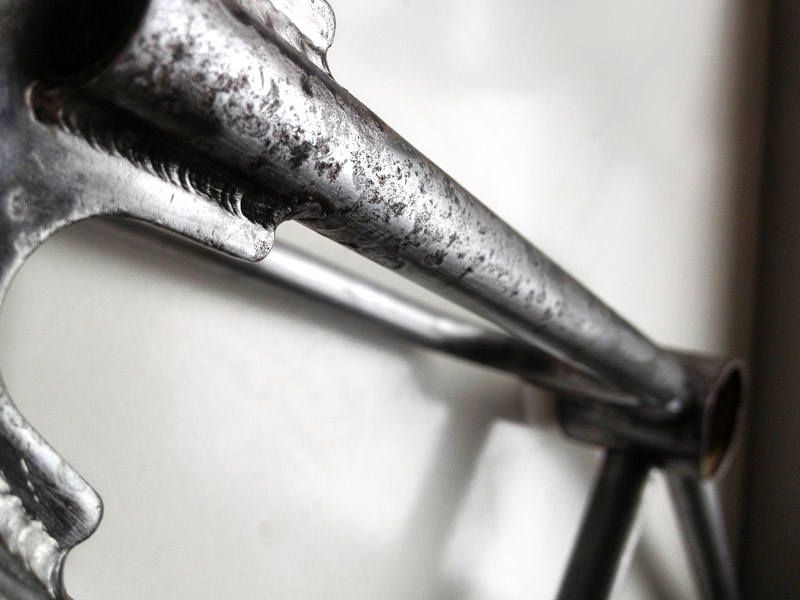
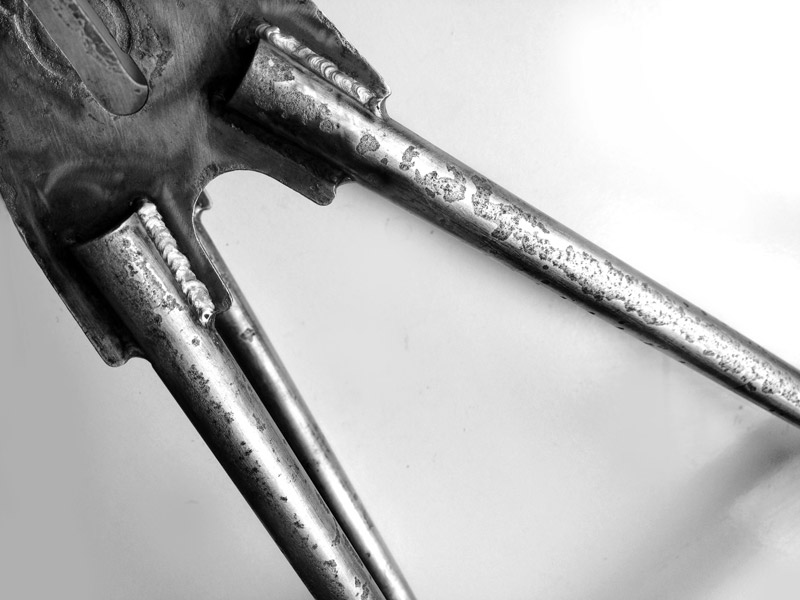
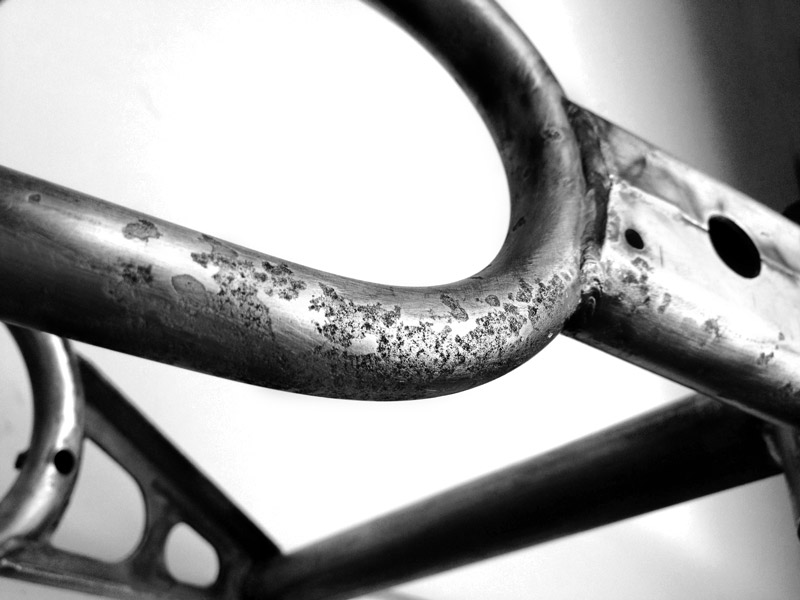
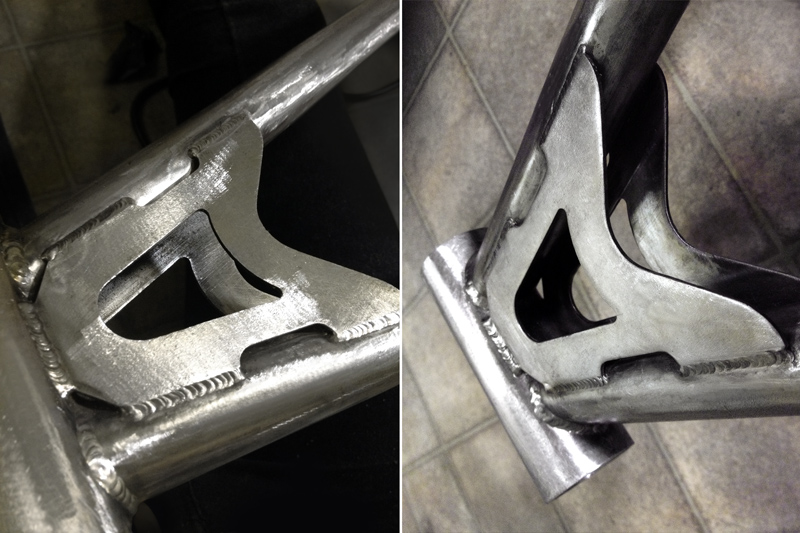
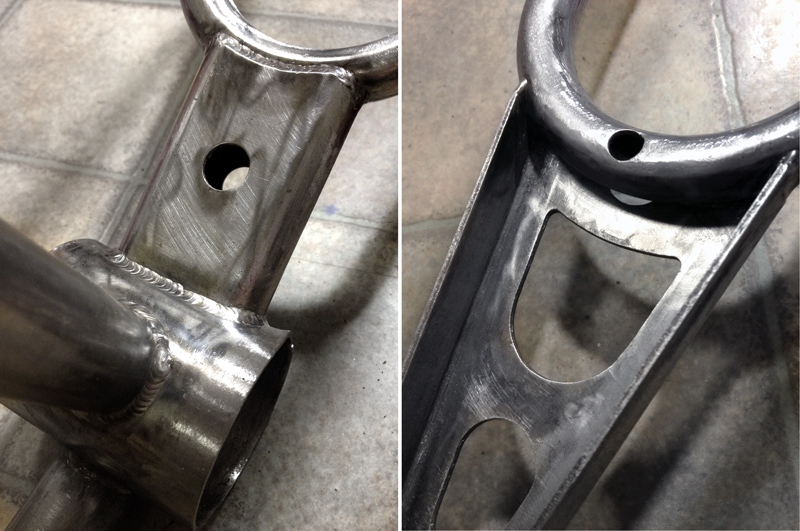
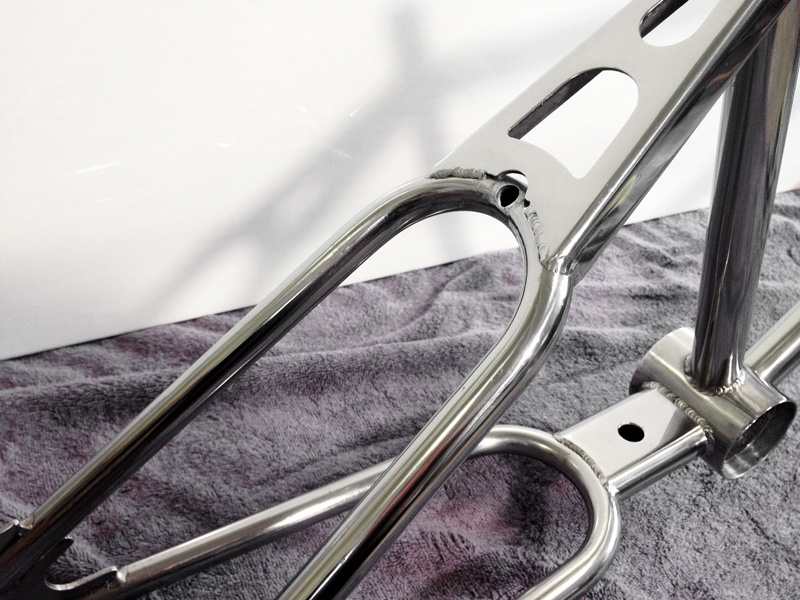
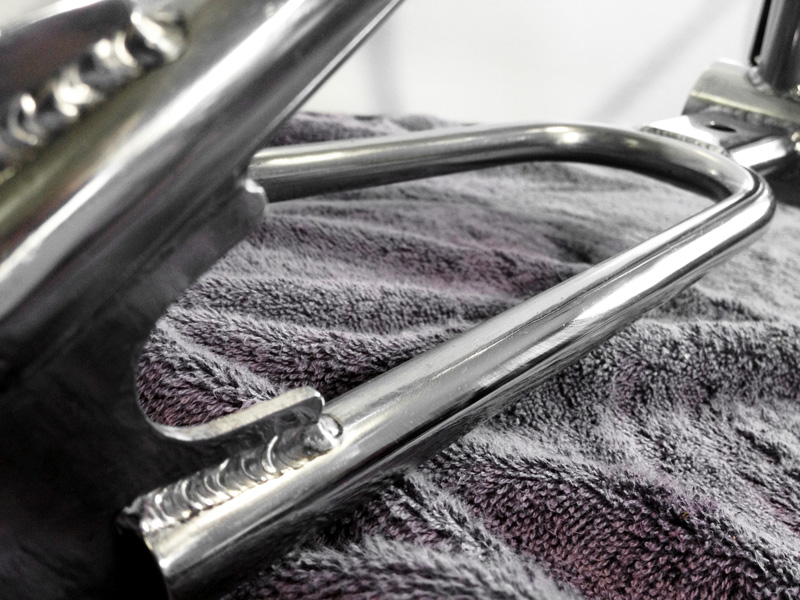
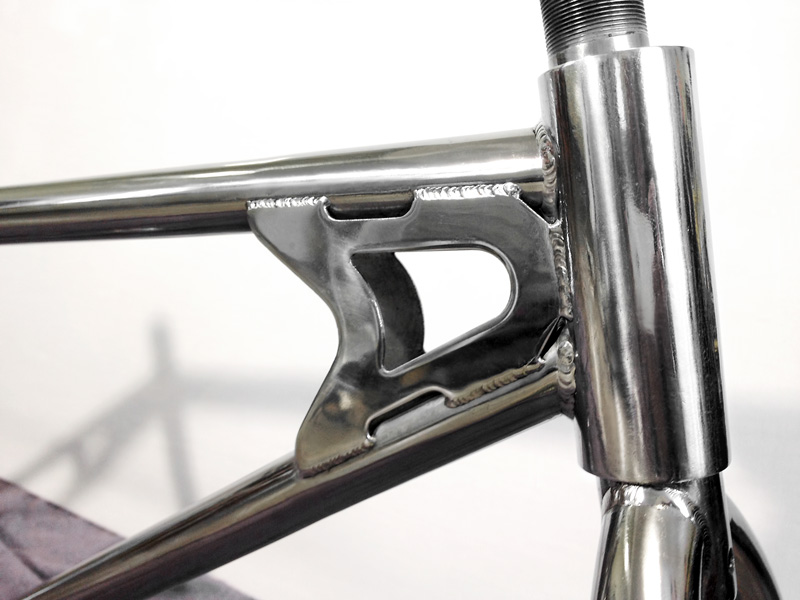
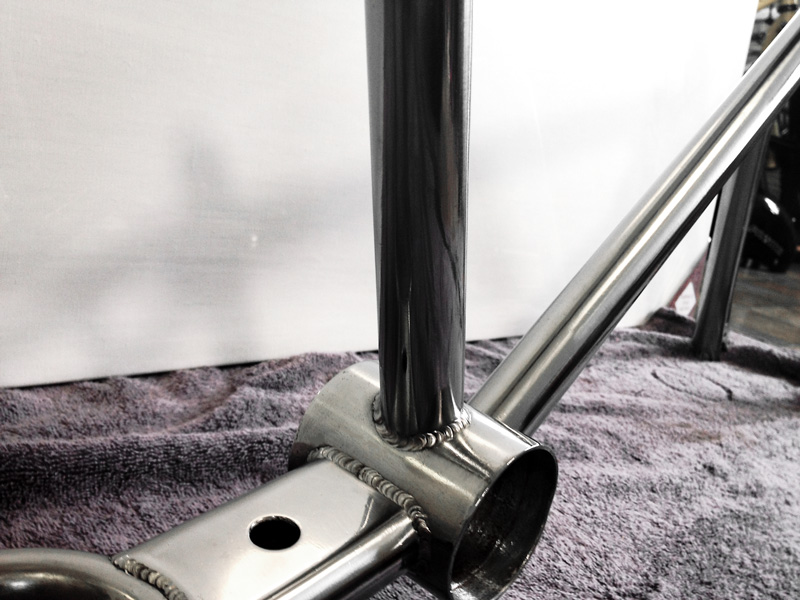
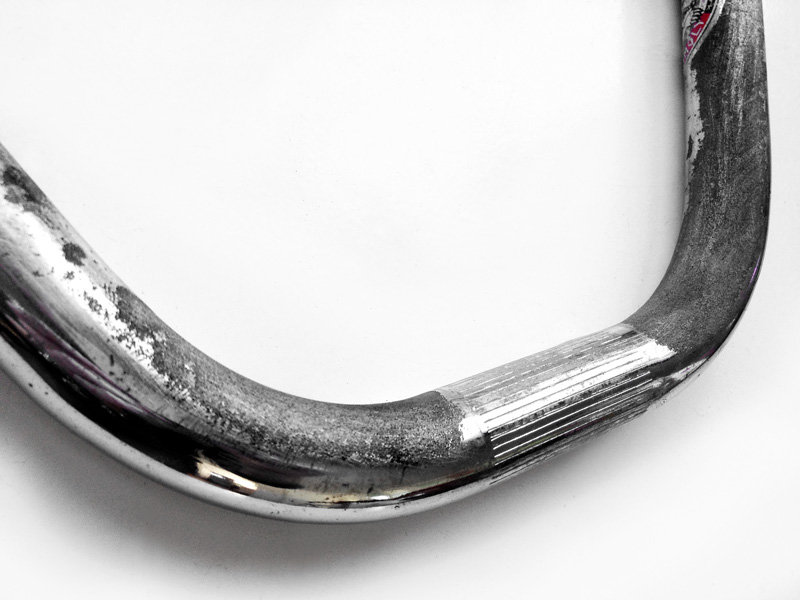
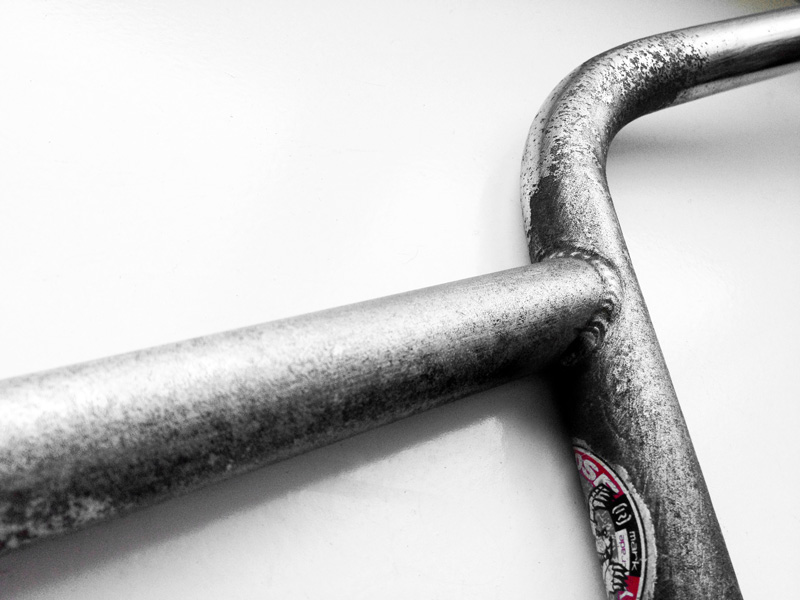
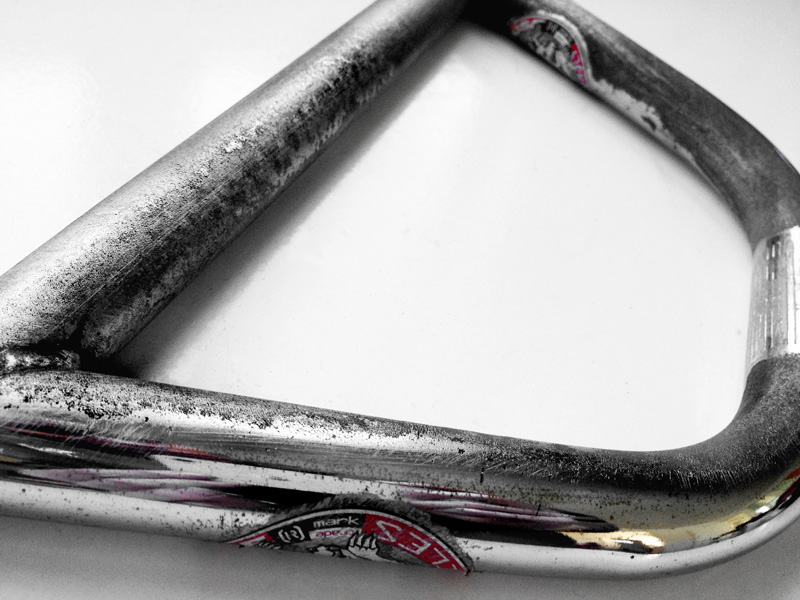
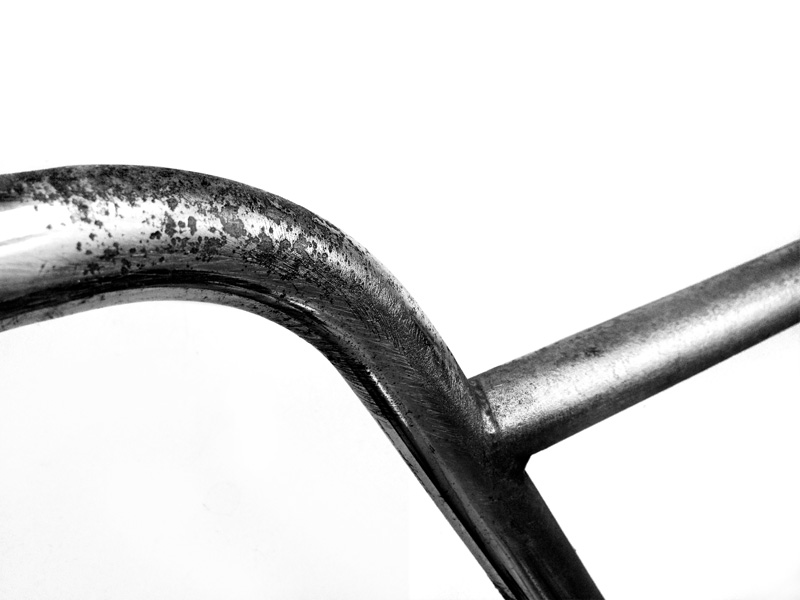
Great progress on the frame. All pitting now filed away and I’ve spent some time with the Dremel wire brush and a sandpaper wrapped flat head screw driver cleaning out the insides and underneath areas of all the tight spots ie. gussets, BB, matchbox.
The marathon of weeks and weeks and weeks of frame prep is drawing to a close. Doing final polishing on the frame and forks now. Then on with the initial anti-corrosive clear coats before the colour detailing. Then I’ll start building up the gloss acrylic clear coats to give them enough time to cure well for a couple of weeks before I build it all up. I’ve never worked to a deadline with a build before… but it’s going ok so far!
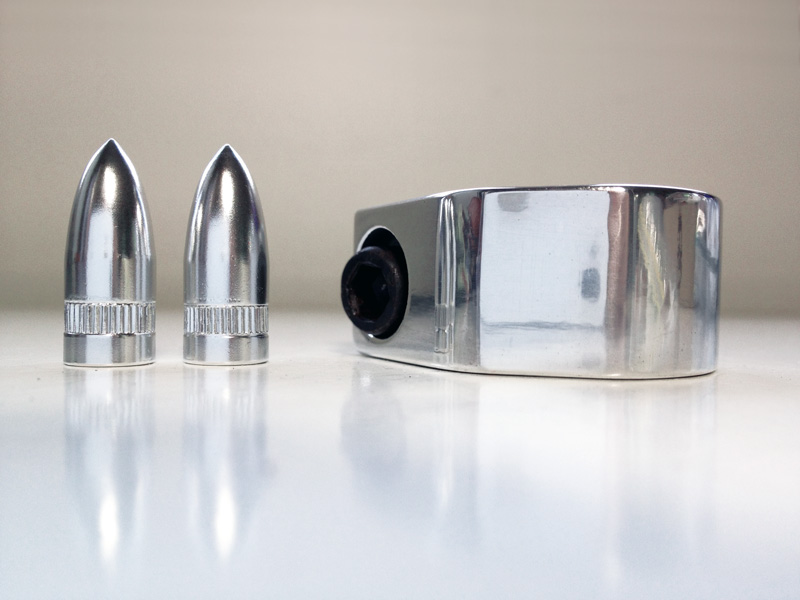
Details, details, details… here’s a couple of little pieces of RAWR candy, the stripped and polished Tuf-Neck style seat clamp and the aluminium missile valve caps, just hanging cools together…
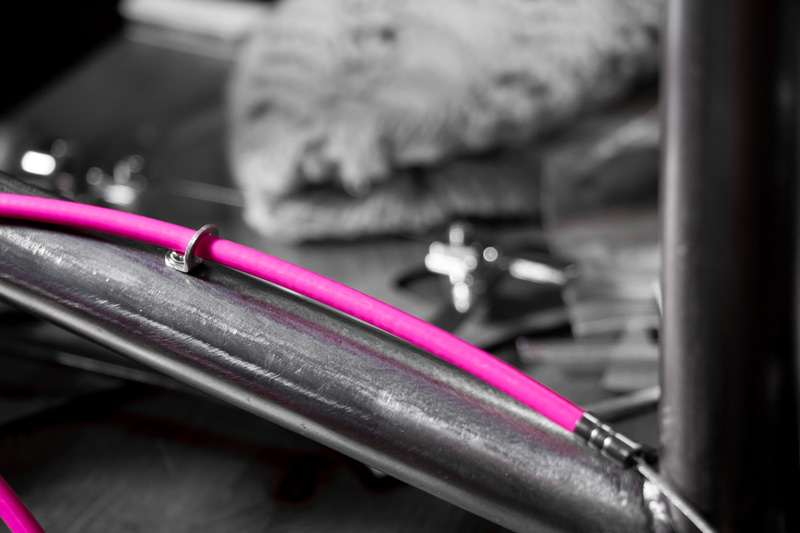
With the frame set halfway through the final polishing process I wanted to make and test-fit a little brake cable guide that’ll screw into the underside of the top tube. I’m not a big fan of the traditional wrap around cable clamps and, as I don’t want a top tube pad on this build, I designed something that would inconspicuously streamline the cable from the front gusset along under the top tube to then pop out and feed straight into the rear caliper.
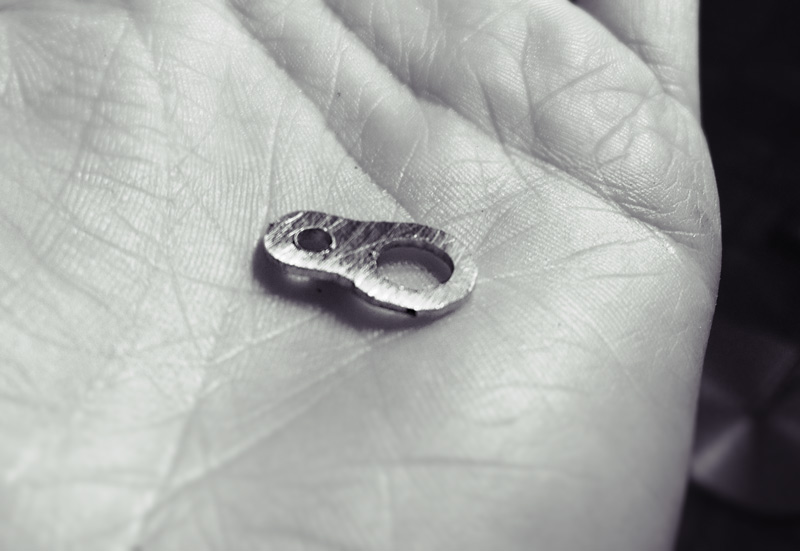
I drew up my cable guide design idea onto a spare piece of 1mm aluminium sheet, then cut it out with a piercing saw…
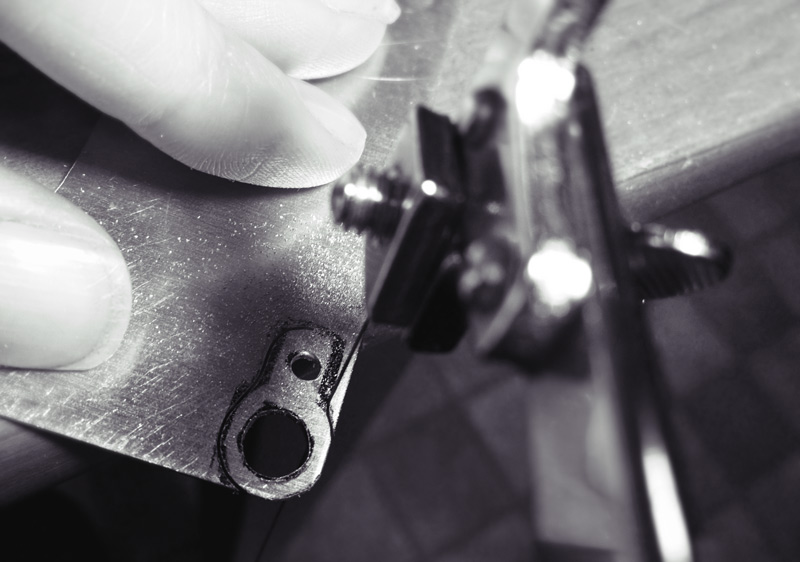
Here’s the raw piece cut out and ready to smooth and fold…
Filed, sanded, folded at 90º and fitted with a screw ready to try out on the frame…
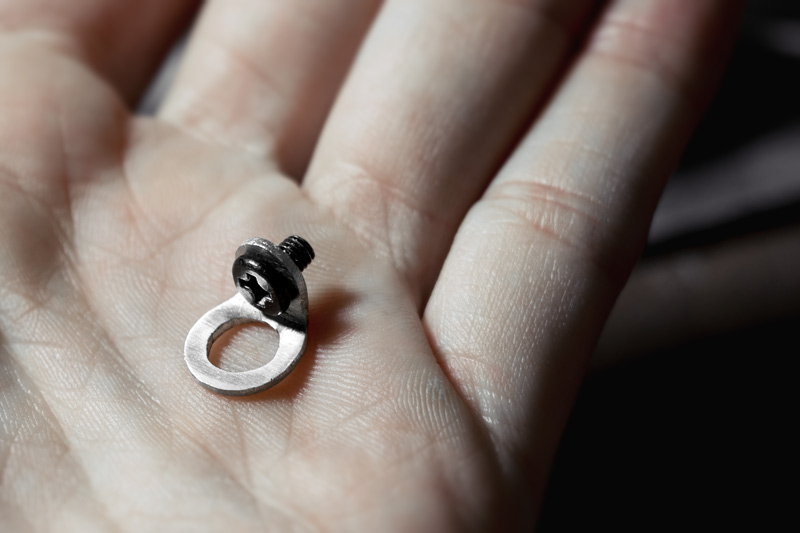
Double checking that the cable still fits through after the fold and with the screw head…
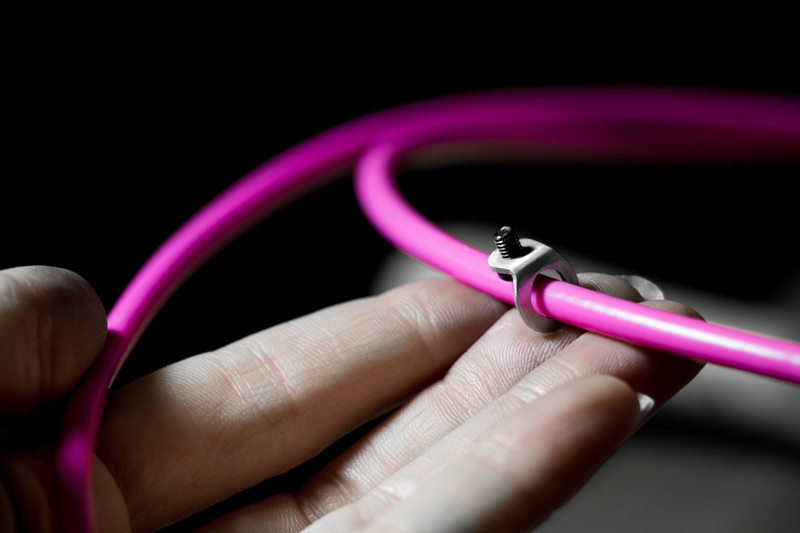
Hole drilled in the underside of the top tube and test fitted…

Very happy! It’ll come off again while I finish with the frame and go back on once the clear coat is all done and everything’s ready to build up.
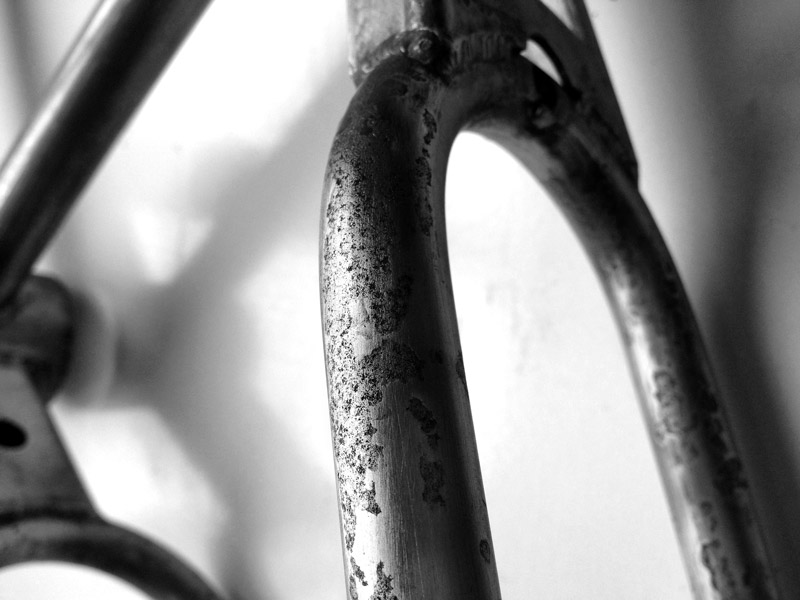
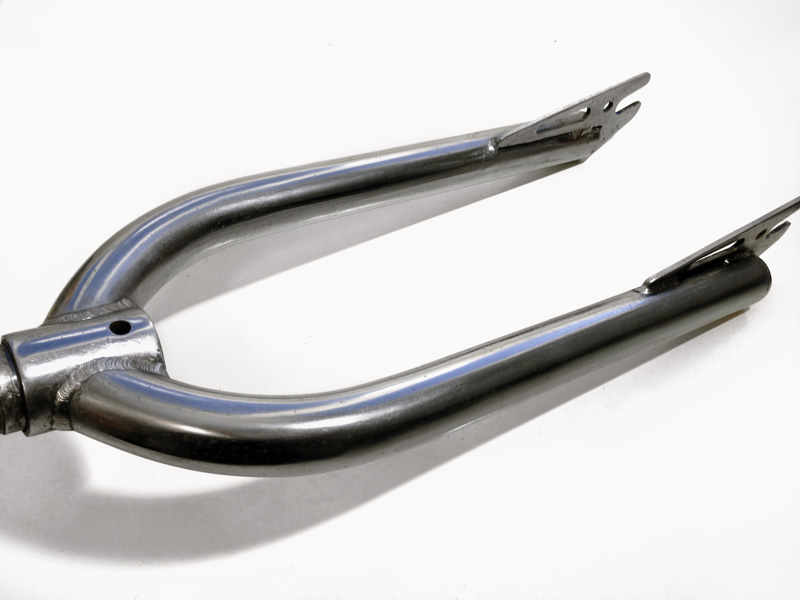
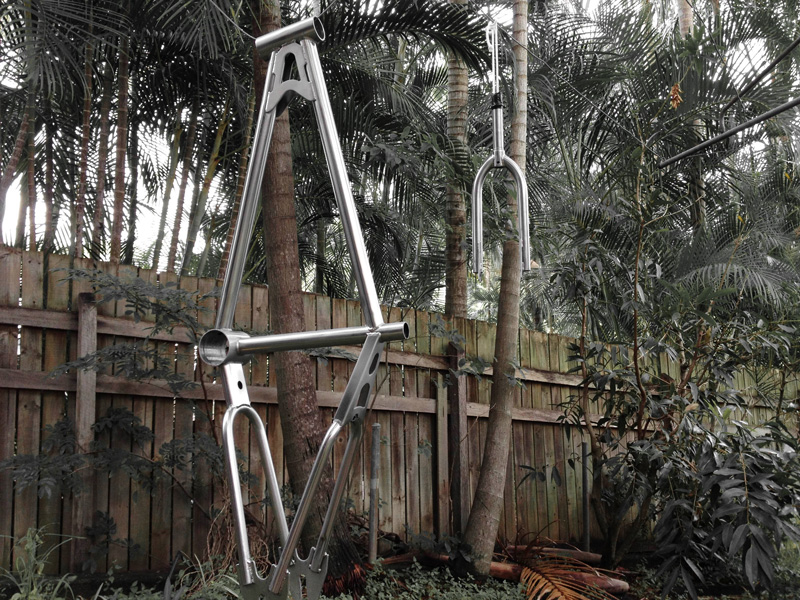
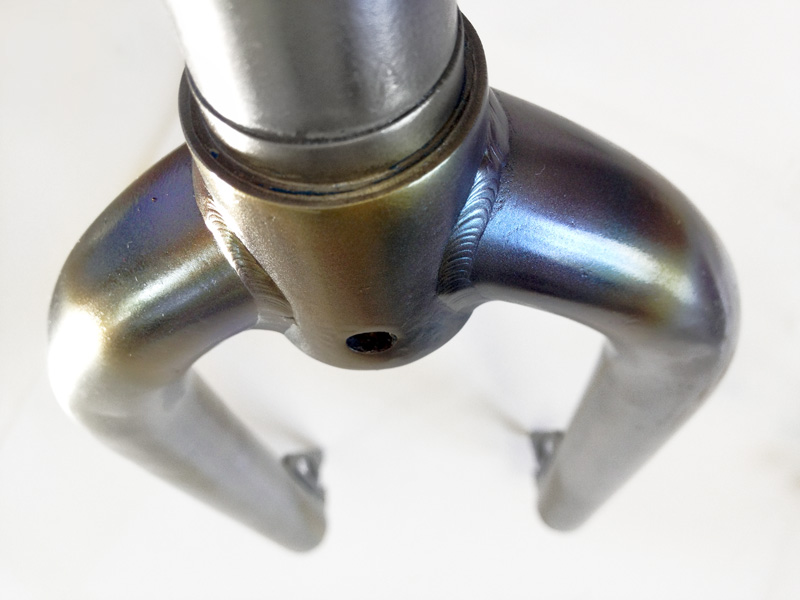
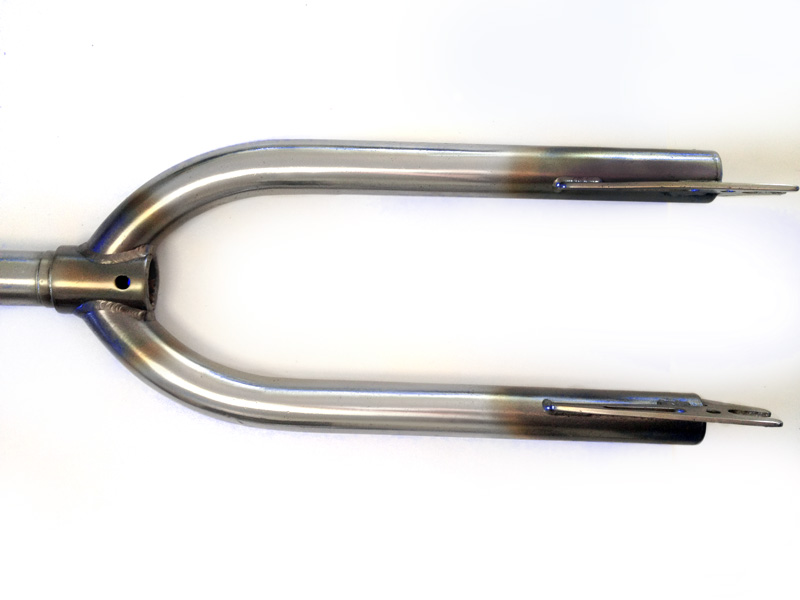
Finished polishing the forks!! Exactly 5 weeks since I started filing, sanding and polishing the heavily rust pitted frame set they’re finally all ready for clear coat …the frame is almost there too!
It’s so satisfying to remind myself how they looked back at the beginning of May….
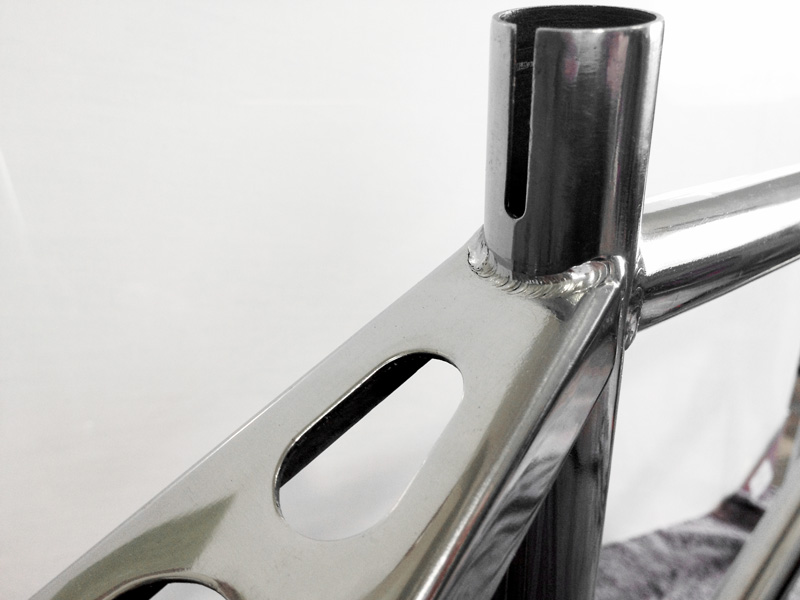
Frame prep FINISHED!! YAY!!
This is might be the quickest build I’ve done to date, but it certainly feels like the slowest because of the labour intensive hours involved. Yes, I AM CRAZY doing a build like this and expecting to have it done within 2months, haha… but fingers crossed I’ll get there…
All ready for clear coat and detailing now….
And one of the before shots again to make me feel like a champ, haha, and to make these tired arms and gnarly hands feel satisfied rather than just sore…. 😉
The bars still need doing, but I want to get the frameset finished first. They’ll be the last part to be restored for the build.
First coats of clear are on (so glad the rain let up!).
I had planned to use Action Corrosion’s Clear Coat aerosol, but the flow and consistency was horrible and the finish was patchy, milky and powdery. I called the company for application advice and they told me to strip it off, wipe down the frame with thinner and do it again. I did that and got the same milky, powdery, inconsistent finish – pretty disappointing from a clear coat product that’s supposed to have a ‘mirror finish’ on polished metal.
So I stripped it off again and went down the road to the hardware store and grabbed a can of White Knight ClearGuard (from their RustGuard series). It went on beautifully and after two coats it still looks like raw polished steel – very hard to tell that it’s coated. Love it. Looking forward to doing the weld detailing next before finishing it off with a few coats of clear gloss acrylic for extra protection and shine.
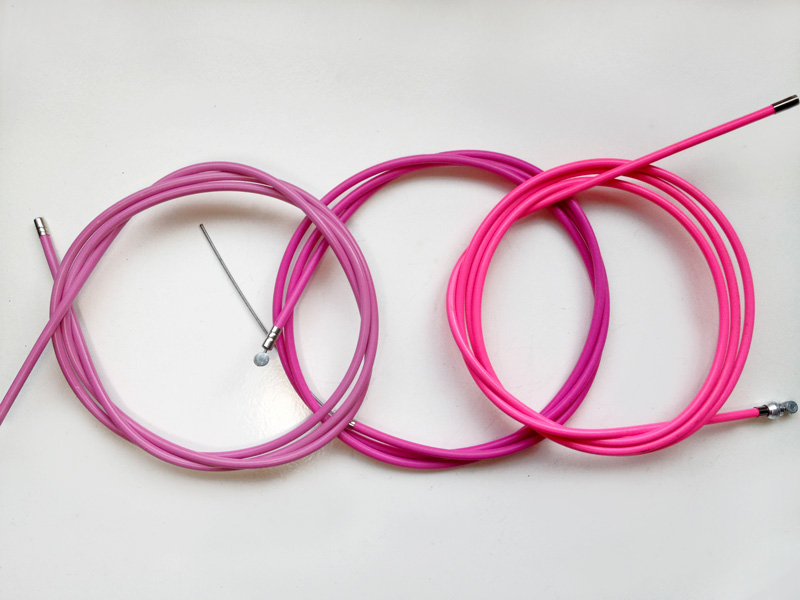
Finding the right shade of pink to really rock it next to the polished steel and the saddle tan seat is something I’m being pretty particular about. I want something that’s really going to pop so I’m going as neon and lurid as possible. In this line up I’ve got (L to R) Hi-Tech pink, Odyssey Linear Slic Kable in hot pink and Porkchop BMX in neon pink (the camera doesn’t capture the epic day-glo of this one). I’ve chosen to go with Porkchop’s neon pink, it looks fantastic next to the other build parts. I mean, if you’re going to go with a pink cable, it ought to be a PINK(!)cable, right?
I’ve pulled the bars out of the acid bath. They’re nice chromoly bars, off a mid school Supergoose, fairly low (which suits the street style of my build design) with nice welds (what’s left of them), but 50% of the chrome is corroded and lifted and there’s a fair amount of pitting underneath. Luckily, mid school era chroming being what it was (at least, for Mongoose), the chrome is pretty thin so fingers crossed it shouldn’t take tooooo much work to get the rest of it off before polishing….
So, this is what’s happening.
I love the Metalcast colours and flow but, now that the frame is polished and sitting there in shiny clear coat, I went and had one of those sort of cartoon-esque moments…
…I looked at all the welds in close proximity around the gussets and the bottom bracket, and then looked at the big Metalcast aerosol cans, and then back at the welds and then back and the cans… then screwed my face up for a minute and then someone in the distance hit a triangle as a lightbulb illuminated simultaneously above my head….
This is the PERFECT scenario for airbrushing! YAY!!! Plus, precision and manoeuvrability aside, being able to mix my own colours from clear primaries to colour match the heat-tint in some of my favourite frame reference pics is going to be even better. And being able to add a Gun Metal grey metallic to the mix is exciting.
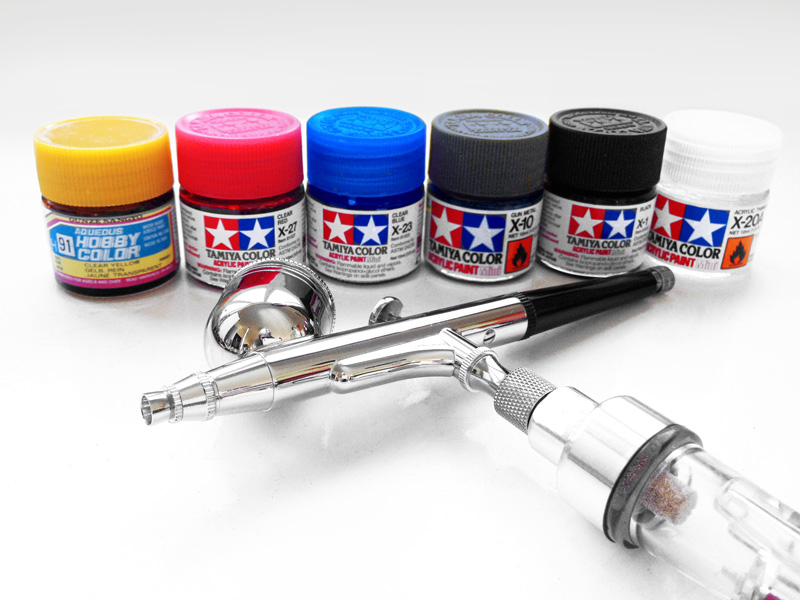
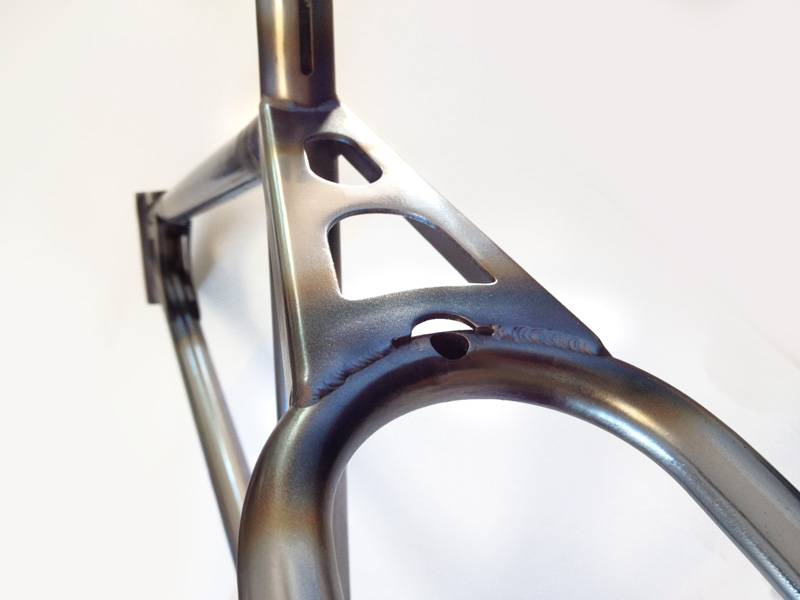
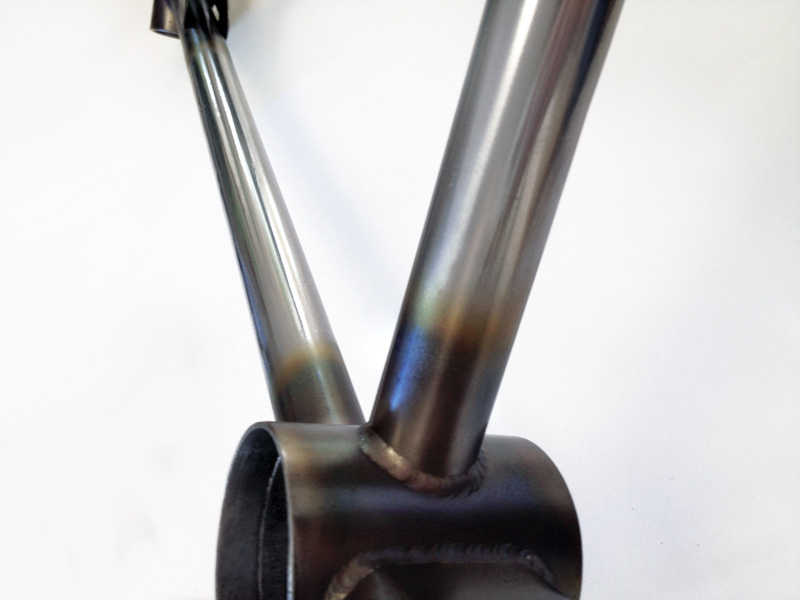
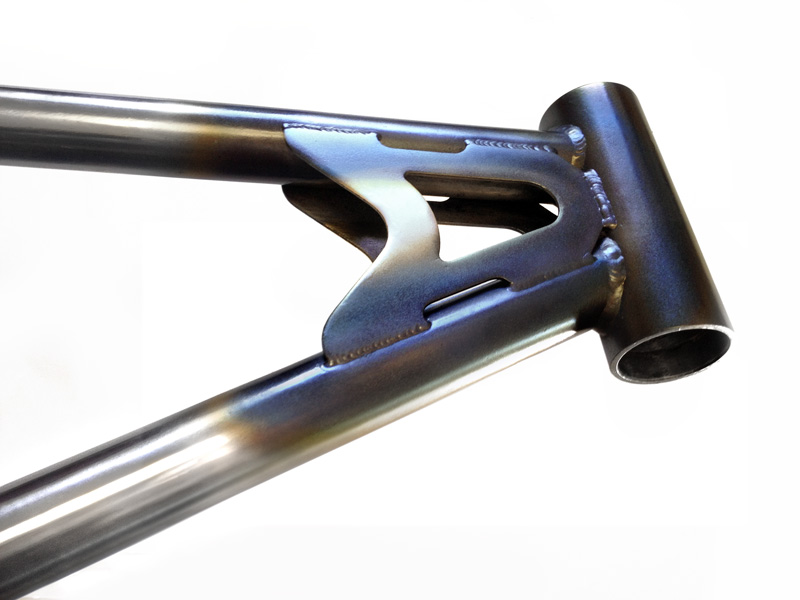
Airbrushing created the perfect result and was a heap of fun to do! Super happy with the colours I was able to mix up and the subtleties that they pull in different lights…
The aftermath. Chaos and order, sort of, haha (mostly chaos!). Could almost pass it off as a Kandinsky… 😉 …any fans of German Expressionism out there looking to get their hands on a rare, lost Der Blaue Reiter piece? :p
The parts pile as it currently sits under my work bench…
Decals fitted. They work even better than I’d imagined – absolutely stoked! Here’s a couple of Instagram teasers of the finished frameset (haven’t fitted the head tube badge yet)…
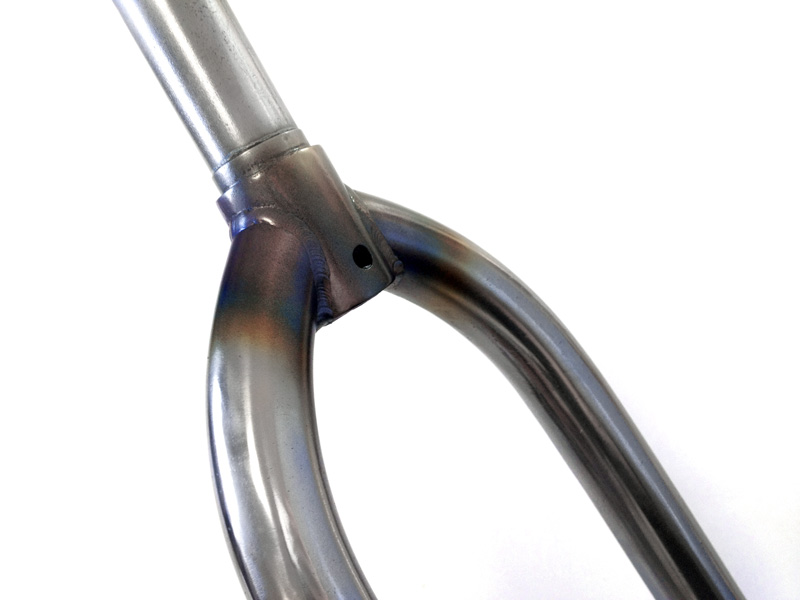
Progress shot of the bars after filing away the pitting and the remainder of the chrome…
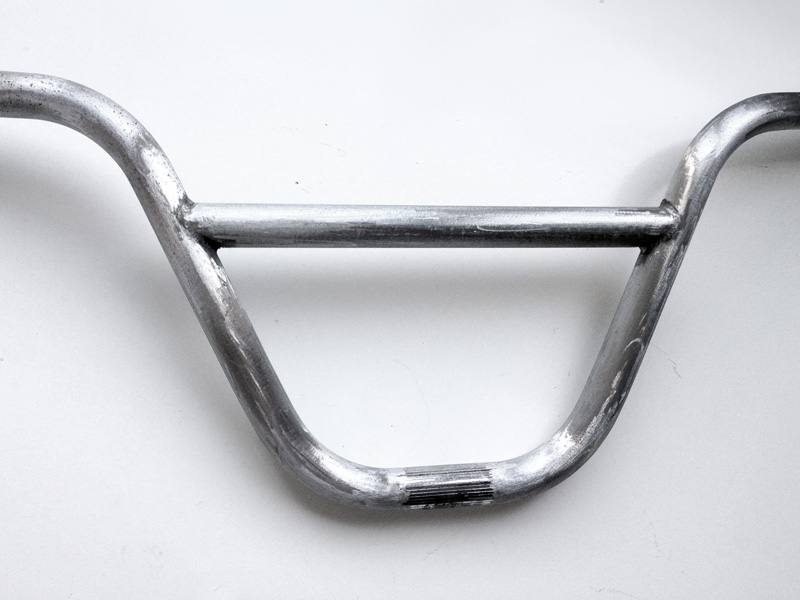
They’re all polished now, with the first 2 coats of ClearGuard on….
Finished putting the wheelset together. Hand sanded and polished all the spokes (while still laced) top and underside, and hand sanded the sides of the Alex rims and then finished them off with a sisal wheel on the bench grinder. Love the look of the Duro whitewalls with the silver and black…
Final airbrushing session done – bars now complete (just waiting on their decals)…

Mission complete!! Couldn’t be happier with the finished build. Don’t forget to check out the little 3min video with some footage of the RAWR restoration process at the top of the page, and here’s a ton of pics below…
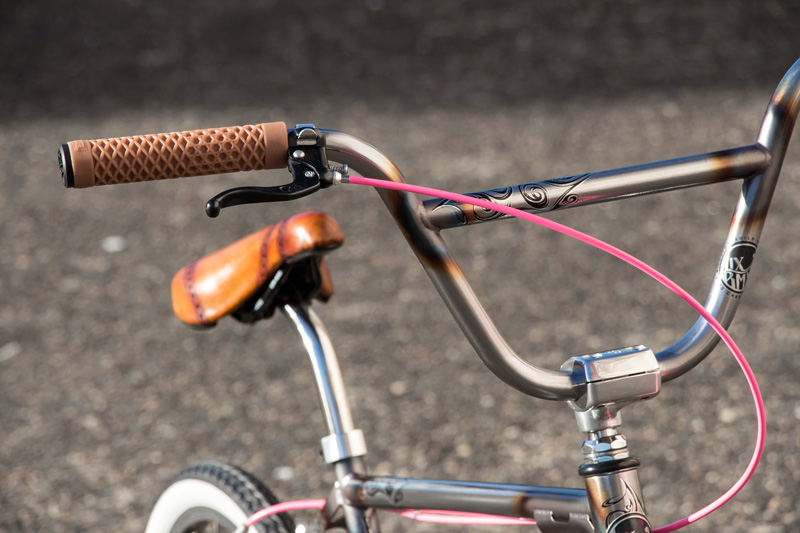
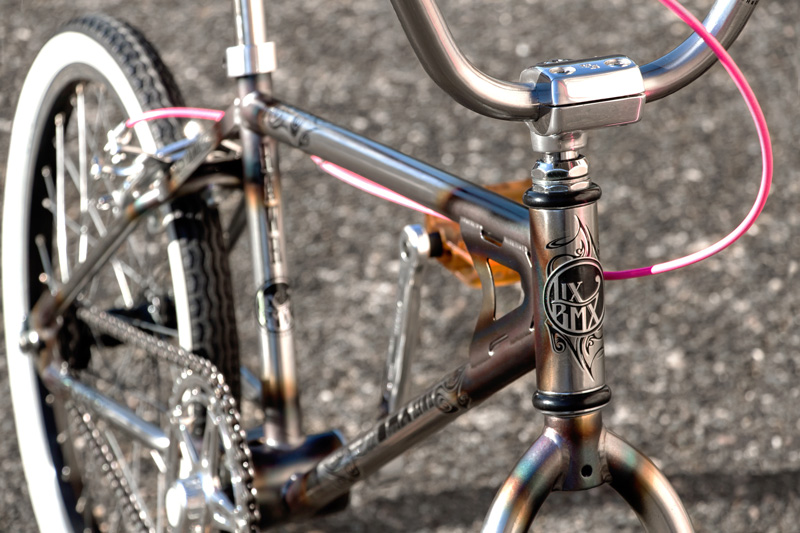
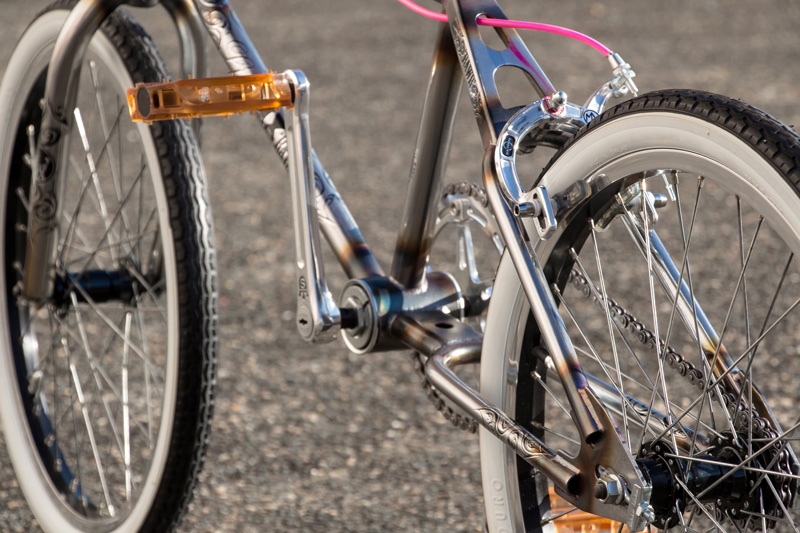
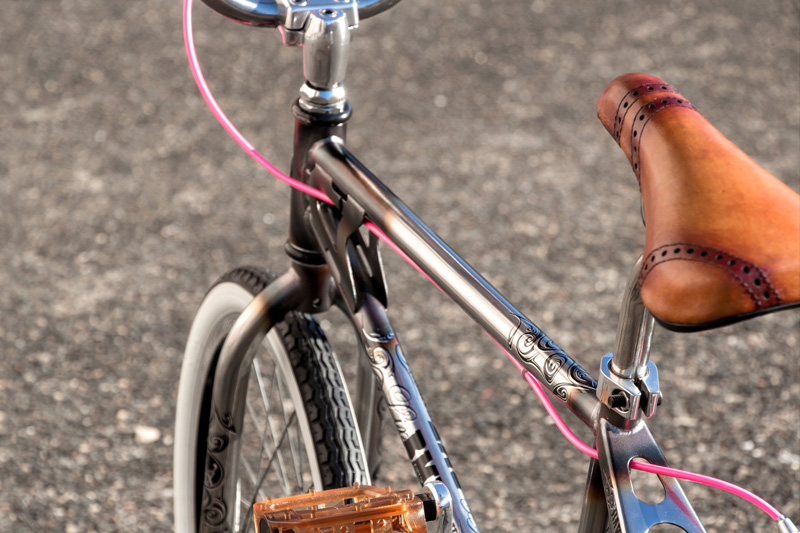
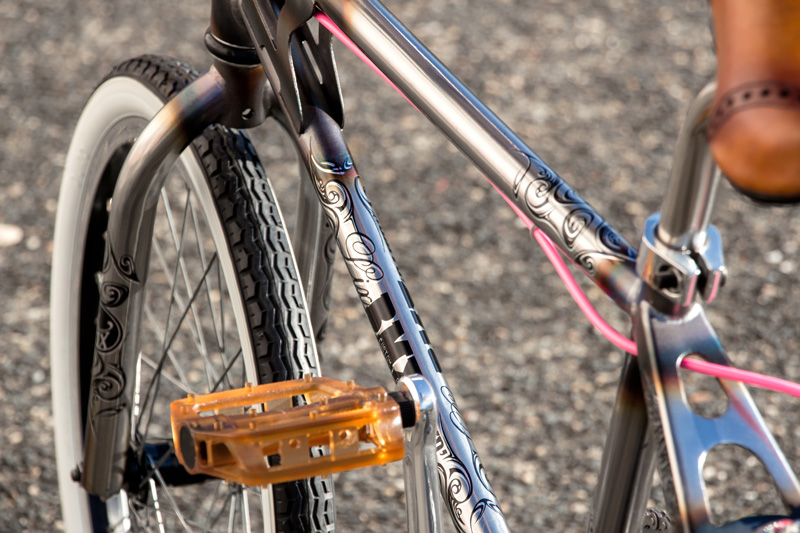
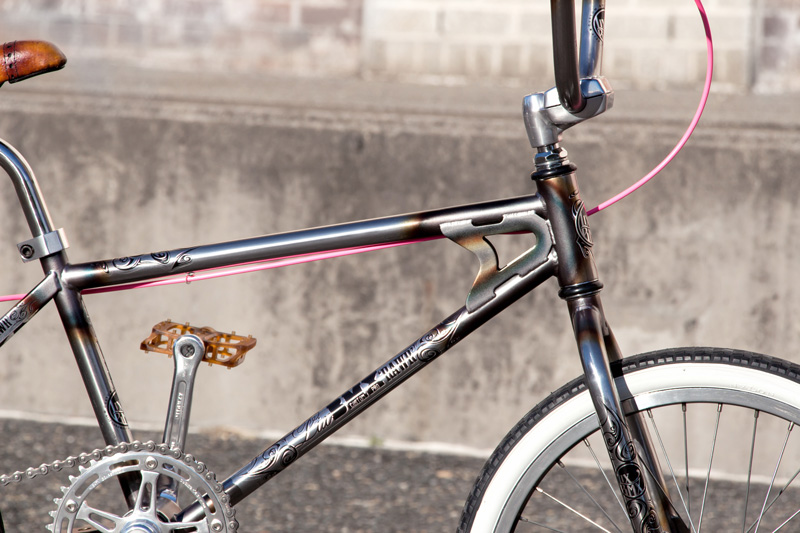
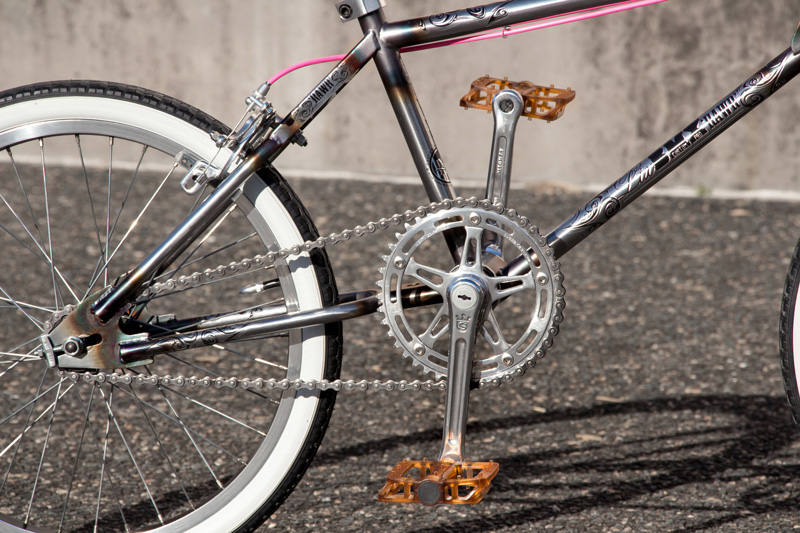
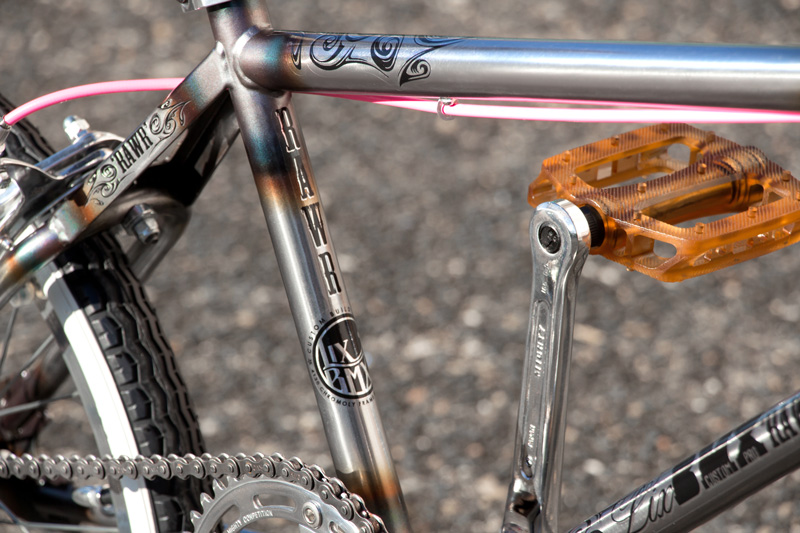
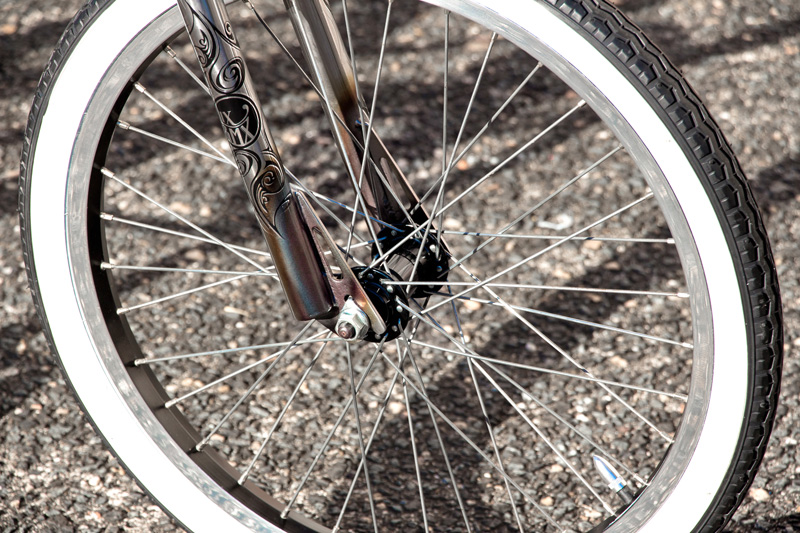
FINISHED BUILD PICS
Shout-outs:
To Richard and Gavin from Pushies Galore for creating such a cool little competition as part of the 2013 show – didn’t think I could love the whole Pushies experience any more than I already did, but taking part in the BMX Build-Off has been just AWESOME fun.
To Brett Tyack @ DetailedBikeCo.com.au for kindly bartering a couple of integral parts in exchange for design services to help keep my build budget intact!
To Pete ‘Drop_Bear_KK‘ for passing this cool little frameset my way last year (I’m so glad Tracey needed that new washing machine!).
To Duane @ Bike-Parts-Plus-More.com.au for the weird myriad of bits and pieces I asked him to send me for this build, and for continually answering my pedantic questions about various parts from his catalogue.
To all the fabulous bike builders, bike photographers, riders, friends, writers and bloggers out there who have inspired me to think outside the box and create something different – a special mention goes out to Adam Leddin of CycleEXIF, Andy White of Fyxo, Adam Eldridge of Stanridge Cycles, Sasha Strickland of Pony Bikes, the team at Treadlie mag, Albert Ocampo, Luis Guarch, Nik Kypreos, Julian Daley and Carson Leh (I can’t wait to get my hands on a REAL Carson Leh seat for my next build 😉 haha)
And last, but definitely not least, to my unfailingly awesome husband James for once again putting up with my OCD bike project insanity and disappearing acts (to the workshop downstairs) while getting this build put together in such a short time frame.